What is Interface in Golang ? A Tutorial with Examples


Interface is an extremely powerful and important aspect of development in Golang as it is a statically typed language. Put it this way, the interfaces make Golang get closer to the paradigm of Object Oriented Languages. In this tutorial, we will learn all about interfaces and see how we can apply them in a program.
So, let us begin.
What is an Interface?
To start with, interfaces allow us to do polymorphism. It allows us to describe the behavior of the object, and it represents a collection of method signatures. Imagine that you have certain methods in the interface. When a particular type provides the definitions for all those methods, then it is said to implement interfaces.
Simply put, an interface is a way of looking at a set of related types or objects. You should know that you cannot create an instance of the interface as it is abstract.
I’m sure this doesn’t create much sense, unless we have a look at a program. So, let’s do that.
Understanding Interface from a Program
First, we create a new directory named ‘inter’. I save all my projects in the go-workspace. So, we will typecd go-workspace
mkdir inter
cd inter
code .
When we type code ., the IDE or the text editor opens up. In my case, I have the VS Code. After the VS Code is launched, we create a Go source file named the main.go.package main
import (
“fmt”
)
type trapezium struct {
basea float64
baseb float64
height float64
}
type rhombus struct {
diagonala float64
diagonalb float64
}
func (t trapezium) area() float64 {
return ((t.basea+t.baseb)/2)*t.height
}
func (r rhombus) area() float64 {
return ((r.diagonala*r.diagonalb)/2)
}
- Ok, this portion of the code is fairly easy to understand. As you can see, we have created two structs. These are trapezium and rhombus.
- The trapezium struct has three data fields basea, baseb, and height, all of type float64. Similarly, the rhombus struct has two data fields diagonala, diagonalb of type float64.
- Next, you can see that both trapezium and rhombus have similar behavior, i.e., we can call ‘area’ on them. While both of them have different implementations, still you can call trapezium area and rhombus area.
- So, at this point, we can see that both the rhombus and trapezium have a shape and they have an area. The interface allows you to look at the types (rhombus and trapezium) as if they are the same. It does not take a look at the details.
- This is the time when the interface allows us to define the behavior that is similar between the objects or types.
Defining the Interface in golang
Now, we will define the interface. Following the import(), we define it.type shape interface {
area() float64
}
With this, we have defined the shape interface. The interface here mentions that if any type or any struct has the area() method, and that returns float64, is of type shape. That is, it implements the interface shape. Now, we can use the interface as an upper level type of the struct.
How to Use the Interfaces in golang
Following this, we will learn how to use the interface. For this, we move on to the function main.
func main() {
r1 := rhombus {6,4}
t1 := trapezium {8, 6, 4}
shapes := []shape {r1, t1}
}
We use the interface just like any other type. Since the rhombus and the trapezium both implement the shape interface, you can use the type shape and plug them both inside the slice. As soon as you use the interface as a type, all of the remaining behaviors of rhombus and trapezium that are true, you cannot access them through the interface. The only thing that you can get access to is the area method.
Now, let us incorporate a for loop in the main function.
for _, shape := range shapes {
fmt.Println (shape.area())
- If we run the program, we will get to see the following output:

- If you implement the interface, then you are allowed to use the objects inside of the type interface and make use of all the behavior defined in the interface.
Let’s Create a Function
- A great aspect about interfaces is that you can use them as any kind of type. It does not necessarily have to be a slice, you are allowed to use them as parameter types, variable types or return types.
- Irrespective of what you want, you can implement them in a map. This introduces flexibility as you can now use all the different types under the interface. So, let us define a function
func Result (s shape) float64 {
return s.area()
}
- We are defining a function Result and taking parameter s shape that will be returning float64. And it will return s.area(). Here we are passing the shape that could be rhombus or trapezium, as long as it has the area method with it.
- Next, we move on to function main again. And in the fmt.Println statement, we will return
fmt.Println (Result (shape))
(Note: Since this is a different program, we will write the code in a different Go source file titled ‘tutorial.go’)
What if The Methods Accept a Pointer?
What we will do is make a little modification. We will make the methods accept pointers now, and not the actual instance.
func (t *trapezium) area() float64 {
return ((t.basea+t.baseb)/2)*t.height
}
func (r *rhombus) area() float64 {
return ((r.diagonala*r.diagonalb)/2)
Accordingly, we will have to make some changes in the main function also. In this statement, shapes := []shape {r1, t1}, we can no longer use r1 and t1 as these are not pointers but rather values. The problem should be solved by the following statement.
shapes := []shape {&r1, &t1}
It is actually a good practice to always pass the pointer when you are making slices. This is because if you need access to the pointer, you can have it.
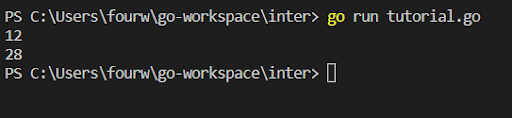
Now, if we run the program, you will get to see the following output:
Hopefully, you have understood the interface. If you are still in doubt, then you must go through the tutorial once again. And it is mandatory that you have a look at other examples, and practice coding on your own. Only then will you be able to grasp the concept properly.
To get access to the code, you should visit the Github repository https://github.com/GolangCompany/inter.


Build Your Golang Team