Build a Simple Todo App with Golang and Basic CSS and JavaScript


If you have been reading our blogs, then you are already aware how to create a RESTful API using net/http package, gorilla mux library and gin framework. And you have also seen how Golang for app development is rapidly becoming a trend. In this tutorial, let us get one step further and create a simple todo app. That’s right! An app that will help you schedule your daily tasks and once it has been accomplished, you can tick them off.
So, let us get started.
What Are We Going to Do?
We are basically going to create a todo list app. We will further take it up a notch by incorporating static assets like CSS and JavaScript and templates. And in order to write the code down, you need to have a text editor or an IDE. In this case, we will be using the VS Code.
Let’s Go to VS Code
- Before we get started, we have to create a new directory. I’m using Windows, so I will use Command Prompt. However, if you are using Linux or macOS, then you will have to use Terminal. I save all my projects in go-workspace, so I’ll type
cd go-workspace
mkdir todo
cd todo
code .
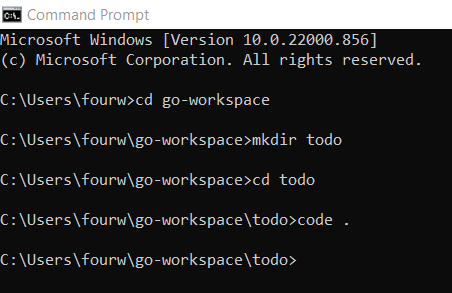
- As you can see we have named the directory ‘todo’. Following code ., the VS Code opens up. And we create a source file named main.go, where we will type the logic of the code.
package main
import (
"html/template"
"log"
"net/http"
)
- As you can understand, here we have imported three different packages, namely html/template, log and net/http. Following this, we keep on typing the code:
var tmpl *template.Template
type List struct {
Object string
Finish bool
}
type PageInfo struct {
Title string
Todos []List
}
- Ok, so we have a lot to understand from this chunk of code. As far as templates are concerned, we will be using them throughout the course of the code in different functions. This is because we will have to access the template.
- In order to enable this, we will have to create a global variable:
var tmpl *template.Template. We are calling this tmpl, and we are making a pointer and a template object. Be careful to import the html/template package for this. - Next, as you can see we have created two structs. These are List and PageInfo. The list function that we are going to create next must have a list of things (the to-do list of things). Thus, we require a couple of structs.
- In the List struct, we have two data fields. These are Object of type string and Finish of type boolean. Following this, in the PageInfo struct, we have the Title data field of type string, and the array of items Todos []List.
- Let’s move on with the rest of the code.
func list(w http.ResponseWriter, r *http.Request) {
data := PageInfo {
Title: "ToDo List",
Todos: []List{
{Object: "Write scripts", Finish: true},
{Object: "Shoot video", Finish: false},
{Object: "Edit the video", Finish: false},
},
}
tmpl.Execute(w, data)
}
- As you can see, we have created a list function next. And we have passed the parameters
w http.ResponseWriter, r *http.Request.We can see that we are using a response writer and pointer to the request object. The ResponseWriter interface plays a pivotal role in construction of an HTTP response. The Request method mentions the HTTP methods, i.e, GET, POST, etc. - Next, we create an object data where we will pass the values of PageInfo. What we are doing here is an inline instantiation of the PageInfo. This is why we need the Title which is “ToDo List”
- Following this, we have to make an array of the Todos. Here, each array is going to refer to a basic struct. That’s why type
Todos: []List{
{Object: "Write scripts", Finish: true},
{Object: "Shoot video", Finish: false},
{Object: "Edit the video", Finish: false},
},
- Finally, we wrap up the function with tmpl.Execute (w, data) which is basically taking the template objects. We are just passing the ResponseWriter and the data(where we pass the struct with all the values written down).
- Next we move onto the function main(), which will execute the program.
func main() {
mux := http.NewServeMux()
tmpl = template.Must(template.ParseFiles("templates/mark.gohtml"))
fs := http.FileServer(http.Dir("./static"))
mux.Handle("/static/", http.StripPrefix("/static/", fs))
mux.HandleFunc("/list", list)
log.Fatal(http.ListenAndServe(":8080", mux))
}
- Ok, so this is the crux of the code and we have a lot to comprehend. Let’s analyze each statement carefully.
- We are starting with a basic setup. We are creating a mux server
mux := http.NewServeMux.The NewServeMux is responsible for allocating and returning a brand new ServeMux. The ServeMux is an HTTP request multiplexer. It invokes the handler after checking each incoming request's URL against a register of patterns. - We are creating an endpoint for the URL and this will be “/list”, and we will have the method list, as we have created a function named list.
mux.HandleFunc("/list", list) - With the statement
tmpl = template.Must(template.ParseFiles(“templates/mark.gohtml”)), we are instantiating tmpl. The template.Must is crucial to wrap around the templates. If it is not there, then the program will crash as it didn’t get the required templates. Next, we wrote template.ParseFiles which represents the string of templates. - The .html works just fine. However, using .gohtml is the standard, so we will stick to it. In order to run the server, we have to include the statement
log.Fatal(http.ListenAndServe(":8080", mux)). We are binding the server to 8080. - Now, we will take a look at these two statements:
fs := http.FileServer(http.Dir("./static"))
mux.Handle("/static/", http.StripPrefix("/static/", fs))
- We are making a file server here. We are creating fs and we are using http object and we are going to get a FileServer. Next, we will use the http directory which will be “./static”
- Finally, we have to handle the “static” and then we have to Strip the Prefix of the “/static/”. It is important to be careful with the slashes.
With this, the main function comes to an end.
Meanwhile, if you are stuck with a project, then you should not hesitate in hiring experts who will choose Golang for app development. They will guide you how to write the code precisely and efficiently.
Go to the mark.gohtml File
- What we are going to do is create a folder named ‘templates’ inside the ‘todo’ directory. And we are going to insert a source file named mark.gohtml. Following this, we type the code:
1
2
3
4
5
6
7
8
9
10
11
12
13
14
15
16
17
18
19
20
21
22
23
24
25
<!DOCTYPE html>
<html lang="en">
<head>
    <meta charset="UTF-8">
    <meta http-equiv="X-UA-Compatible" content="IE=edge">
    <meta name="viewport" content="width=device-width, initial-scale=1.0">
    <link rel="stylesheet" href="/static/css/format.css">
    <title>TODO</title>
</head>
<body>
    <h1>{{ .Title }}</h1>

    <ul>
        {{ range .Todos }}
            {{ if .Finish }}
                <li class="finish">{{.Object}}</li>
            {{ else }}
                <li>{{.Object}}</li>
            {{ end }}
        {{ end }}
    </ul>

    <script src="/static/js/script.js" type="text/javascript"></script>
</body>
</html>
- As you can see, it is just an HTML file. Following the <body> we will start putting in the templates. To render a named field, we will just use .Title. We will put the title in H1. Then we loop through an array of Todos using the keyword range. This is the unordered list.
- Next, we will check if .Finish, then make a list item with class of “finish” and we will render the .Object. In case the object is not done, then we will go to else. Finally, we end it with ‘end’ keyword.
- With this the mark.gohtml file comes to an end.
Work on the static Folder
Next, we will work on the static folder (which is present inside the directory ‘todo’), which consists of css and js folders. The css folder in turn consists of format.css file and the js folder consists of the script.js file.
Let’s Get Started with the format.css File
We type the following code:
1
2
3
4
5
6
7
8
9
10
11
12
13
14
15
16
17
18
19
20
21
22
23
body {

background-color: orange;

color: steelblue;

width: 50%;

margin: 0 auto;

}

ul li {

cursor: pointer;

}

.finish {

text-decoration: line-through;

}- As you can see, the code that is written here is self-explanatory and nothing fancy. I have just added the background color, color of the font, put them in the center. Then we have a list of objects which have the pointer. Once the task is completed, we will just put the line-through the task.
Let’s Move on to script.js File
The code that is written in this section is simple enough to understand. We have just typed:
1
2
3
4
5
6
7
8
9
10
11
12
13
14
15
let objects = document.getElementsByTagName("li")


for (let i=0; i<objects.length; i++) {

objects[i].addEventListener("click", () => {

objects[i].classList.toggle("finish")

})

}- What we are doing here is getting all the list objects and we are going to loop through them. Then we are adding an EventListener. If you click on it, it is going to toggle that the class is “finish”. If there is no class performed here, then if you click on it, the class will be “finish”.
Time to Run the Program
Finally, we will run the whole code. For this, we go to our Terminal and type go run main.go. Then as we open a browser and type localhost:8080/list, we get to see the following snapshot.
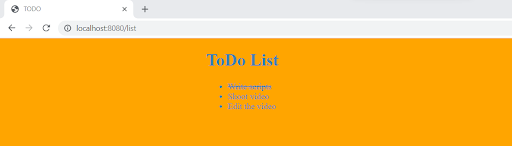
This means that the program is successful and we have gotten our desired output. In this tutorial, not only did you learn to code in Golang, but also how to code in css and JavaScript. In a way, you learned about frontend and backend development. How cool is that?
In order to get access to the whole code, you should visit: https://github.com/GolangCompany/todo-app.


Build Your Golang Team