How to Build a Blockchain with Golang - Learn from the Scratch


In this blog, we are going to learn how you can create a blockchain in the Golang programming language from scratch. Before we get started, it is imperative that you are aware of the fundamental concepts in Golang. I hope you have been going through the blog posts posted on Golang.Company. In this tutorial, we will also cover the Go module system.
Let’s Get Started with the Program
Creating the Directory
In order to get started, we will create a new directory. Let’s name this directory ‘blockchain’. For this, we will have to code in the Command Prompt (or if you are using macOS or Linux, then you have to use the Terminal). So we type:
cd go-workspace
mkdir blockchain
cd blockchain
code .
With the last statement, the VS Code launches (my preference of text editor). You can use any other IDE or text editor.
Next, the application that I will write on Command Prompt will be recognized by the compiler
go mod init github.com/golang-company/blockchainI am hereby specifying the name of the module that I have created. Upon execution of the command, you will notice that you will have a new file inside of the folder ‘blockchain’. And this file is the go.mod file.
Programming in main.go
We will now go ahead and write the application inside main.go. We will also bring in third-party libraries. In order to show how this works with the Go module system, I will create an instance first.
package main
import (
“fmt”
“rsc.io/quote”
)
func main() {
fmt.Println(quote.Hello())
}
The rsc.io/quote library that we have imported enables us to get hold of various strings and then print them out. (Note: If you do not have the rsc.io/quote installed, you have to get it. For this, you have to type on the Terminal: go get rsc.io/quote and it will get downloaded.)
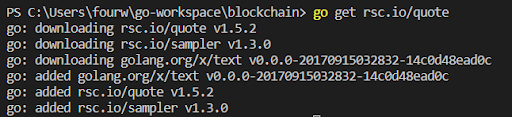
Now, let’s run this program on the Terminal, we will get the following output:

You will notice that there is another file created under the ‘blockchain’ directory named ‘go.sum’. It consists of all the dependencies for the third-party library that we have incorporated into our application.
Now that you have got insight into the basic concept required for this tutorial, let us proceed to the main topic of blockchain in Golang.
What is Blockchain?
A blockchain can be stated as a public database that is distributed and decentralized across a number of different peers. With blockchain, even if the node is generating incorrect data, the database has the ability to fix itself. That is what makes blockchain different than other distributed solutions. The database does not have to “trust” the nodes, which is why it enables you to implement an application of cryptocurrency, smart contracts, etc.
The blockchain consists of a number of different blocks. Every block consists of the data that we wish to transmit inside the database, and hash that is associated with the block. It also consists of the cryptographic hash of the previous block. Thus, in order to represent this, we will have to create a struct.
Programming: Blockchain in Golang
We will get started with the programming in go blockchain. We will be erasing the previous program and starting afresh in ‘main.go’.
package main
import (
“bytes”
“crypto/sha256”
“fmt”
)
type Cryptoblock struct {
Hash [] byte
Data [] byte
PrevHash [] byte
}
- The struct is self-explanatory. The Data field can consist of anything from Ledgers, documents to images. The PrevHash represents the last block’s hash. This is what is linking the blocks. If you wish to make a complex blockchain, you will have to incorporate timestamp, block height, etc.
func (c *Cryptoblock) BuildHash() {
details := bytes.Join([][] byte{c.Data, c.PrevHash}, []byte{})
hash := sha256.Sum256(details)
c.Hash = hash[ : ]
}
- Now we will create a method that will allow us to create a hash based on the previous hash and the data. We will use the “bytes” library, so we will import that.
- Next, we create a variable named details and we are going to use bytes.Join() to join the slices of bytes together.
- details := bytes.Join([][] byte{c.Data, c.PrevHash}, []byte{})
- We take a 2D slice of bytes, we pass in the c.Data and the previous hash and then we will combine the empty slice of bytes
- Next, we are creating the actual hash by using the sum256 hashing function on the details. We are able to use this as we have imported the sha256 library.
- Following this, we take the created hash and push it into the Hash field for the block.
(Note: The sha256 algorithm is extremely simple in comparison to the actual way to estimate the hash for a blockchain. We will demonstrate how the hash changes with the change in data)func BuildBlock (data string, prevHash [] byte) *Cryptoblock {
block := &Cryptoblock{[]byte{}, []byte(data), prevHash}
block.BuildHash()
return block
}
- Now, we will create a function that will allow us to create a Block. The function takes in a string of data and then it takes in the prevHash from the last block and it outputs a pointer to Cryptoblock. We will create the block using the block constructor.
- The &Cryptoblock will just be a reference to a block. For the Hash field, we will include an empty slice of bytes, for the Data field, we will take the data string and convert it into a slice of bytes. And we will put the prevHash into PrevHash field.
- Following this, we will call the BuildHash() on our block and return the block from the BuildBlock function.
type BlockChain struct {
blocks []*Cryptoblock
}
- We need to implement a type that will help in representing the blockchain. And we did this by implementing a struct. It consists of one field and it has an array of pointers to Cryptoblock.
func (chain *BlockChain) AddBlock(data string) {
prevBlock := chain.blocks[len(chain.blocks)-1]
new := BuildBlock(data, prevBlock.Hash)
chain.blocks = append(chain.blocks, new)
}
- Now, we are creating a method that will allow us to add a block to the chain. This method gets the pointer for the blockchain. And then it takes in a data string.
- We have to get the previous block in the blockchain and we did this by calling chain.blocks and then passing the length of the blockchain [len(chain.blocks)-1]
- Next, we create the current block by calling the BuildBlock function and passing in the data string and the prevBlock.Hash.
- Following this, we append the new block to the blockchain by using the append function and passing in chain.blocks and then assigning this to the chain.blocks.
func Inception() *Cryptoblock {
return BuildBlock("Inception", []byte{})
}
- We have created a blockchain function with the help of which we will create the first or the initial blockchain. We are just returning the reference to the BlockChain and inside of it we will create an array of Cryptoblock with a call to the Inception function.
func main() {
chain := InitBlockChain()
chain.AddBlock("First Block after Inception”)
chain.AddBlock("Second Block after Inception")
chain.AddBlock("Third Block after Inception")
for _, block := range chain.blocks {
fmt.Printf("Previous Hash: %x\n", block.PrevHash)
fmt.Printf("Data in Block: %s\n", block.Data)
fmt.Printf("Hash: %x\n", block.Hash)
}
}
- Now we come to the main function to put together the blockchain. First we will call the InitBlockChain() and we push it to the chain variable.
- Next, we added certain blocks to the chain by simply calling chain.AddBlock and then passing the data we wish to send across in our blocks. First we have the Inception block, the first block after Inception, and so on.
- The hashes for the blocks will be derived by the information inside of the block and the previous hash. In order to check out the blockchain, we will have to run a for loop and take out each block and then print out each of the fields inside the blocks. And we are able to achieve that by typing:
fmt.Printf("Previous Hash: %x\n", block.PrevHash)
fmt.Printf("Data in Block: %s\n", block.Data)
fmt.Printf("Hash: %x\n", block.Hash)
Let us check out the Output:
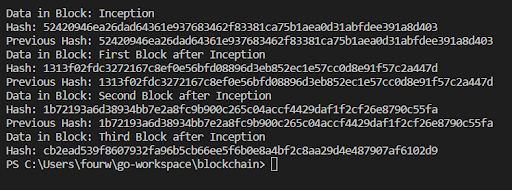
As you can see, the program has run successfully. We are able to see the Data in the Block and the Hash for Inception. Since Inception has no previous block block, there is no previous hash. For the following results, we get to see the previous hash, the data and the hash of that particular block.
All of the code that has been explained in this tutorial will be available on Github at https://github.com/GolangCompany/blockchain/blob/main/main.go
Hopefully, you were able to understand the program and the concept of blockchain in Golang. It is imperative that you try it out by yourself in "Go development." Only then will you be able to grasp the concept. Happy coding!


Build Your Golang Team