How to Create a Golang Module?


Now that you are familiar with the initial concepts of Go web programming, it is time to move on to something interesting. As you may have guessed by the title, we will be creating a Go module. Seems intricate? Well, it won’t be after you have gone through the entire blog, and applied all the steps properly.
A Brief on Go Modules
Go modules typically consist of Go packages and a project or library, which are released together. The packages are usually stored in the form of a file tree. And you have the go.mod file right at the root of the tree. This go.mod file plays a pivotal role in describing the dependency requirements and module path. In this blog, we will try to see how we can create such modules.
How to Create a Go Module?
In this section, you will get a step-by-step insight into creating a new Go Module.
1. Open the Command Prompt
I usually store all my Golang projects and files inside the go-workspace directory (that is located on the desktop). However, in order to maintain clarity, I’ll be creating a separate directory. This is because I want to showcase that after creating the go.mod file, we get a Go module, and that we can import the module to any other directory.
- Let us create a directory named ‘gym’. We will save this directory on the desktop. In order to do so, we have to open Command Prompt. And we will type the following code:
cd Desktop
mkdir gym
cd gym
code.
With the last command, the VS Code opens up (my choice of IDE; you can use any other)
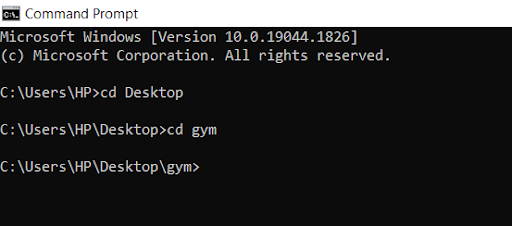
This picture proves that we have successfully created the directory gym.
2. Get Started with VS Code
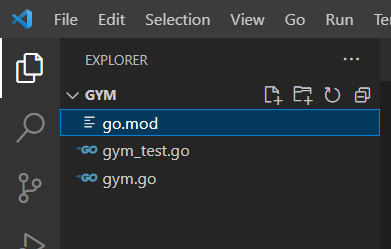
- As the VS Code loads, we create two source files inside the directory gym.go and gym_test.go. While we will be writing a simple program inside gym.go, we will run a test inside gym_test.go.
- So let us delve into the gym.go source file. We will type the following code
package gym
func Gym() string {
return “Welcome, Gym members”)
}
This is an elementary program with no main function as you can notice. We have just included the function Gym() inside it.
- Now let’s move on to another source file, i.e, gym_test.go. We will be running a test here. So, we type:
package gym
import “testing”
func TestGym(t *testing.T) {
want := “Welcome, Gym members”
if got := Gym(); got !=want {
t.Errorf (“Gym()= %q, want %q”, got, want)
}
}
Just remember that the testing package helps you automate the tests of the different Golang packages.
- Now we will be typing ‘go test’ in the Terminal. What do we see? Well, we get a straightforward message that states
‘go: go.mod file not found in current directory or any parent directory; see ‘go help modules’
Now, why do you think this is the case? Well, can you see the go.mod file? No, right? Do you remember what we have learnt? A Go module should consist of a number of packages with a go.mod file at the root of the tree. So what we basically have here is only a package called gym, and nothing else.
So, our next step would be to create the go.mod file so that we can import it into any other directory.
3. Creating the All-Important go.mod File
Now, in this step we will create the go.mod file as planned. For that, we use the Terminal again and type:
go mod init github.com/gym
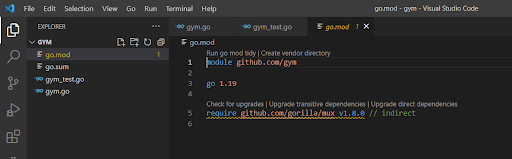
When we do so, we get to see the go.mod file at the root of the tree. This is illustrated by the picture below.
4. Click on the go.mod File
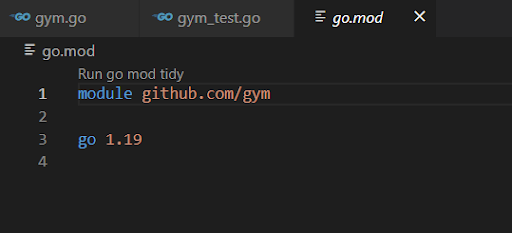
- Once you click on it, you will get to see the name of the module (github.com/gym), which you can change later if you wish to. And you will also be able to view the current Go web programming version that you are using (for me, it’s 1.19)
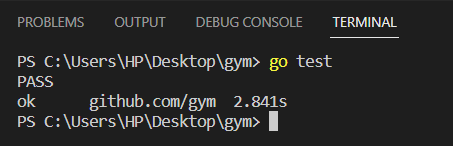
- Now, let us run the test again from the Terminal. As we type go test, we get the following output in the Terminal
- When the Go command sees that it is inside the go module, it will start acting differently. For example, the go get command that fetches the dependency from a particular repository, it will edit the dependency.
Are you still with us? Good! Then let’s move on to the next section.
Fetching the Gorilla Mux Router (Example)
- To illustrate the previous point, an example is necessary. So, in this instance, we can go get the gorilla mux router. For that, you have to type in the terminal
go get github.com/gorilla/mux
- When we enter, it will go on to download the package in the version 1.8.0. And it will add the dependency to the requirement.
Point to be Noted: If you happen to go outside the go module, and type the same command again, it will not add the gorilla mux dependency to the go module. However, it will still be downloaded outside of the go module, in another directory.
Hopefully, you have understood how you can create a Go module and add dependencies as per your requirement. In order to understand it better, it is wise if you follow the steps and use command prompt and VS Code (or any IDE of your choice) to actually type the code and see it for yourself.


Build Your Golang Team