How to Build RESTful APIs Using Gin Framework?


There are various ways to create a REST API in Golang. And the gin framework is one of them. As you may have read the title, in this blog we are going to delve into the gin framework. We will create a basic functioning API so that you can use the knowledge to create intricate projects. So, let us get into it without further ado.
What is the Gin Framework?
The Gin framework is used to create web APIs, and frequently used by go developers instead of gorilla mux and Go fibers. It is one of the most popular frameworks. If you want speed and high performance for your APIs, then this is the framework to use.
Initial Task
- So what does the initial task entail? Well, we have to create a directory and save it in our go-workspace to get started. For this, you have to use the Command Prompt on Windows or Terminal on Linux and macOS. I am working on a Windows system, so I’ll use Command Prompt to write:
cd go-workspace
mkdir ginapi
cd ginapi
code .
(Point to be Noted: I had originally named this directory ‘artsbul’l when I started, but I changed it to ginapi. So you will still notice the artsbull directory in the snapshots)
- As we type
code ., our editor opens up. In this case, the VS Code will open up. You can have any other IDE like Goland, Vim, etc.
Enter the VS Code
- Now as we enter the VS Code, we have to create a main.go file, which will house the function main. So, let us get started and understand how to use the Gin framework to create REST APIs.
- Now in order to install the gin framework, we have to use the Terminal in the VS Code and type the following command. For that, first we have to create the go.mod file. So, we type:
go mod init github.com/GolangCompany.
- When we do so, we get to see that the go.mod file has been created. And when we type the following code,
go get github.com/gin-gonic/gin
We see:
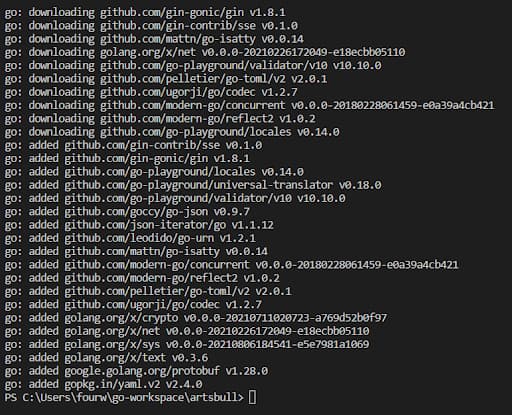
And once the required packages have been downloaded, go.sum file is created which keeps a log of all these packages.
The gin framework is hosted on github.com and once it has been installed, we have to import it while typing out the program.
Create a Basic GET API
Let’s start by writing down the code.package main
import (
“fmt”
“net/http”
“github.com/gin-gonic/gin”
)
func main()
{w :=gin.Default()
w.GET (“”, func (s *gin.Context){
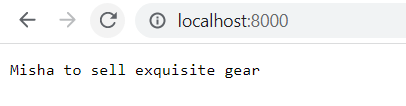
s.String(http.StatusOK, “Misha to sell exquisite gear”)
})
w.Run (“localhost: 8000”)
}
- Now, let us understand what is going on here. In order to create the basic GET API, we have to create a default module for the gin (framework). The gin will contain the default middlewares like the logger middleware or the recovery model.
- The logger and recovery models are inherent properties of the gin framework and you can customize the logger and the recovery model as per your requirement.
- I have created a variable w and it consists of the default settings and with this w, I have created a GET API. Here, the first parameter that I have passed is the URL of the API.
- The base URL is denoted by w.Run (“localhost:8000”), and it is actually the place where the API will be hosted. And the first parameter actually describes the relative path of the API.
- Following the “” parameter in the w.GET, there is a handler function. It represents a sequence of functions that you can pass, and it greatly depends upon the use case. If you have certain middlewares in mind for an API, you can actually create them and start employing them right away.
- The *gin.Context is a pointer to the variable, and it represents the parameter of the function. So, here the ‘s’ represents the context.
- When the context returns a value, it should be s.String or s.JSON. And here there are two parameters involved. The first parameter is about the status(http.StatusOK) which is a plain integer. We are able to use this as we have imported the net/http package.
- Next, I’m sending a string, and it depends on you how you desire to send the data as a response (whether you wish to send a single string or multiple strings).
(SideNote: A design pattern known as middleware allows for the elegant addition of cross-cutting issues like logging, managing authentication, or gzip compression without having numerous points of interaction with the code. The controllers and user-defined handlers may concentrate on the essential business logic since middleware handles these cross-cutting issues. Simply put, a middleware handler is responsible for wrapping another http.Handler while it is itself a http.Handler and it handles various stages of a request)
Now We Run It
- Now, it is time to run this program. We do so with the help of
go run main.go
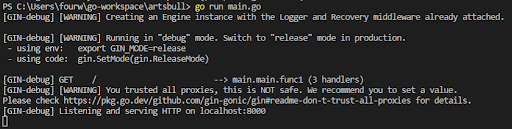
As you can see, there is a GET request on a blank URL. And it consists of a configured function. You can also see that the engine is running on a release mode. There is also 1 endpoint and it is running on localhost 8000.
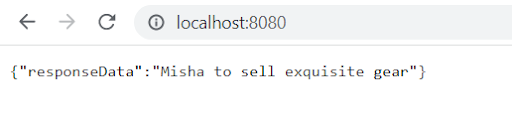
Now, if we go to the browser and type localhost:8000, we see:
And we also get to see in the Terminal on VS Code:

Trying Out An Alternative
- You can also use the s.JSON() method instead of the s.String() method. In that case, you will have to configure one line. Instead of
s.String(http.StatusOK, “MIsha to sell exquisite gear”), we will type:
s.JSON(http.StatusOK, gin.H{
“responseData”:“MIsha to sell exquisite gear”,
This method also requires the StatusOK, and with the gin.H, you can customize the map. Then you are sending the “responseData” which is the key and the value for that will be “MIsha to sell exquisite gear”.
Again We Run It
When we run the program, we get to see

- The process is almost similar to the one above. Here, I have just changed the port, because if we do not change it, then an error will be shown ‘tcp 127.0.0.1: 8000: bind:Only one usage of each socket address (protocol/network address/port) is normally permitted.’
So, we have chosen a different port this time which is 8080. Only if you do this, then you will find that the program is running perfectly and that the required data is hosted on the particular port
- So, we are getting the required output as you can see.

Creating a GET API Where Parameters Are Passed through URL
Let us just assume that you have one API where you wish to get some value that can be in the form of a random string that you wish to get from the URL.
w.GET(“/:newsupdate”, func (s *gin.Context){
var val = s.Param(“newsupdate”)
s.JSON(http.StatusOK, gin.H{
“newsupdate”:val,
})
})
//3rd section
- The manner in which we can pass a variable name in the GET request is by separating it by a colon. So, when we write anything after the base URL, it would be treated as ‘newsupdate’.
- To get the value of the ‘newsupdate’ parameter we will state that context of Param and the variable name that we have configured. The gin will get the newsupdate and pass the result to the val.
- Next, we see that I’m sending a JSON which consists of the value.
Run This Program
- In this section, we will try to run the program that we have written above. For this, again we have to type go run main.go.
- Again, we have to change the port, or else we will receive the same error. So, we changed the port to 8000 this time.
When we do so, we get to see:

- If you observe carefully, you will notice that there are two APIs running, denoted by GET/ and GET /:news update. There is one blank API and the other API is expecting the news update, or certain variable in the URL.
- When we type
localhost:8000in the browser, we do not get anything. The API is expecting a value. So, you have to insert a string afterlocalhost:8000/ tube amps are better than AMP sims.

Thus, we get to see the value as “value”:”tube amps are better than AMP sims”
- The way we can keep track of all the APIs are highlighted by the snapshot below.

Next, we try something different with the API.
Trying and Hitting a POST API
package main
import (
“fmt”
“net/http”
“github.com/gin-gonic/gin”
)
- we type:
type News struct {
Date int `json:”date” binding: “required”`
Name string `json:”name” binding: “required”`
}
This goes on to show that we are expecting data of type News which have the data fields: Date of type integer and Name of type String. Now, the data is sent as JSON. So, we have configured the JSON parameters accordingly.
-The keys are json:”date” and json:”name” and we have also stated that binding is necessary. If the Date value or the Name value is not received in the data, then it will show an error.
-Following the //3rd section, we type:
w.POST(“/add”, func (s *gin.Context){
var data News
if err := s.ShouldBind(&data); err != nil{
fmt.Println (err)
s.JSON(http.StatusBadRequest, gin.H{
“error”: fmt.Sprintf(“%v”, err),
})
} else{
s.JSON(http.StatusOK, gin.H{
“data” : data,
})
}
})
- Let us understand this chunk of code. In the w.POST, we will create the object for News. Then the context ‘s’ should bind to the data model. If s.ShouldBind(&data) returns an error, then it would send the error to the API. The error will be printed.
- In s.JSON(http.StatusBadRequest, I’ve sent a bad request highlighting the error that was received “error”:fmt.Sprintf(“%v”, err).
- In the event that there is no error, then we will send the data back to the API response with the help of a key “data” : data.
Run the Code
- Now that we have understood the program, it is time to check whether the code works or not. For that we again have to type go run main.go. But before you do so, do not forget to change the port, or as in my case I have changed it to 8080.
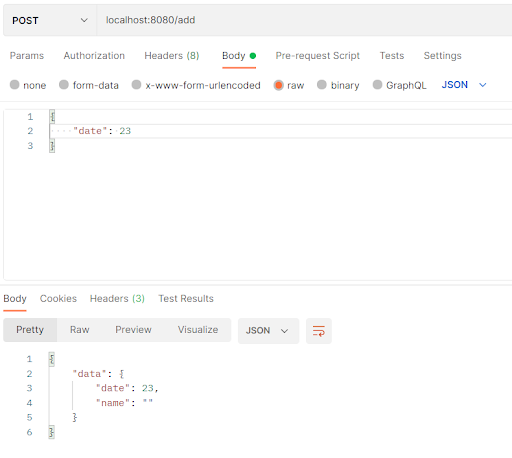
- In order to spice things up, let us start by feeding false data and see what happens. What we will do is only provide the value for “date” and not for “name”. In this regard, I am using Postman API Builder. For this, I have downloaded the Windows 64-bit version.
- Once the Postman is launched, I click on New. Then I choose ‘POST’ and add the address ‘localhost:8080/add’. Then I choose the Body and click on ‘raw’ and select the type JSON.
- In the body, I write the code
{
“date”: 23
}, and I click on Send. I receive the output as
- Now, we provide value for both the data fields. In this case, you take a look at the snapshot below.
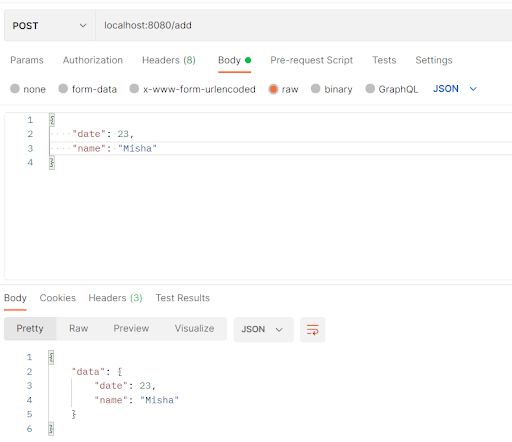
So, we see that we get the desired result from this API. And hopefully, you have understood the program.
In the general scenario, we would like to create certain middlewares which will have the API receiving specific tokens. And you would want to acquire token data and keep it available in the API constantly. But that is a whole different game and needs detailed explanation. Hopefully, you have understood the basic creation of REST API with the gin framework.
In order to get a full view of the code, you can check out our github repo, and the link for that is:https://github.com/GolangCompany/gin-api.


Build Your Golang Team