Ethereum DApp with Golang: Establishing Connection to Ethereum


Golang might be a relatively young programming language, however it is gaining significant exposure due to the number of things we can create with it. In this tutorial blog, we will focus on creating Ethereum DApp for block chain.
But why Golang for blockchain? Well, in short, Go is optimized for distributed services, handling large scalable servers and multi-core CPU architecture. This allows developers to create several goroutines without any hindrance.
So, without further ado, we will focus on the connection of Golang to an Ethereum client.
How to Establish a Connection to Ethereum Using Golang?
- Golang is well-known for its CSP concurrency paradigm and robust libraries. In addition to this, there is also an Ethereum client that is implemented using Golang. You will find it by the name of geth. If you wish to know more about Go Ethereum, you should visit the link https://geth.ethereum.org/.
- In this section, we will use Go to make a connection to the Ethereum client. In this regard, we will be using Infura. It is a service that is provided to the developers by consensus that allows you to connect to the Ethereum node. You can also connect to test nets as well.
Creating a New Directory
- Now, I’ll create a new directory in order to start the project. I usually save all my projects in go-workspace. Since I’m on a Windows system, I’ll be using the Command Prompt. In case you are using a Mac or Linux, then you have to use Terminal.
cd go-workspace
mkdir ethDApp
cd ethDApp
code .
- The last statement leads to the launching of VS Code. Yes, this is the IDE that I’m using for my project. You might use any other IDEs like GoLand, Zeus IDE, Vim-go, etc.
Meanwhile, if you are facing issues creating a ledger, NFT marketplace, tokens, then you should not lose hope. All you have to do is get in touch with the developers associated with Golang.company and you will get the much required assistance with Golang for blockchain.
Getting Started with the Program
The entire program is available on Github. All you have to do is click on the link: https://github.com/GolangCompany/ethDApp.
- In this section, we will get started with the programming. In the VS Code, under the directory ethDApp, we will create a Go source file titled ‘main.go’. This will be the entry point to the Go application that will get connected to the Ethereum node.
- Now, let us jump into the program.
1
2
3
4
5
6
7
8
9
10
package main

import (
	"context"
	"fmt"
	"log"

	"github.com/ethereum/go-ethereum/common"
	"github.com/ethereum/go-ethereum/ethclient"
)- The first thing that we are doing is define that this is the main package. The second thing that we will do is import a bunch of libraries. These are “context”, “fmt” for outputting, “log”. Next, we will import the Go Ethereum client from Github: github.com/ethereum/go-ethereum/common and github.com/ethereum/go-ethereum/ethclient.
- Before we go on to code further, we have to trigger the go mod init in order to initialize the project. So, we will type in the Terminal:
go mod init github.com/golang-company/ethDApp

This will lead to the creation of the go.mod file.
- Next, what we will have to do is get or install the packages and dependencies: github.com/ethereum/go-ethereum/common and github.com/ethereum/go-ethereum/ethclient.
For that, we will again type in the Terminal:
go get github.com/ethereum/go-ethereum/common
This will download all the dependencies

And, we will type:
go get github.com/ethereum/go-ethereum/ethclient
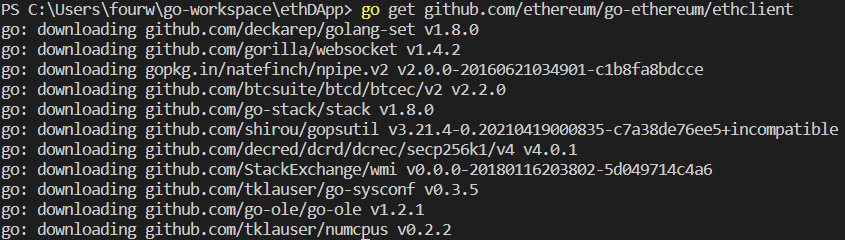
You will see that this leads to the creation of the go.sum file that keeps a log of all the dependencies installed.
- Then we will go to the main function which will act as the entry point to the program. The first thing that you have to do is connect to the ethereum node. So, we will say here ethclient.Dial and we will pass an endpoint that will lead to an ethereum node. In this regard, we will use the Infura node.
- We will use the MAINNET for this instance and we will copy the endpoint. And we will paste the endpoint after ethclient.Dial.
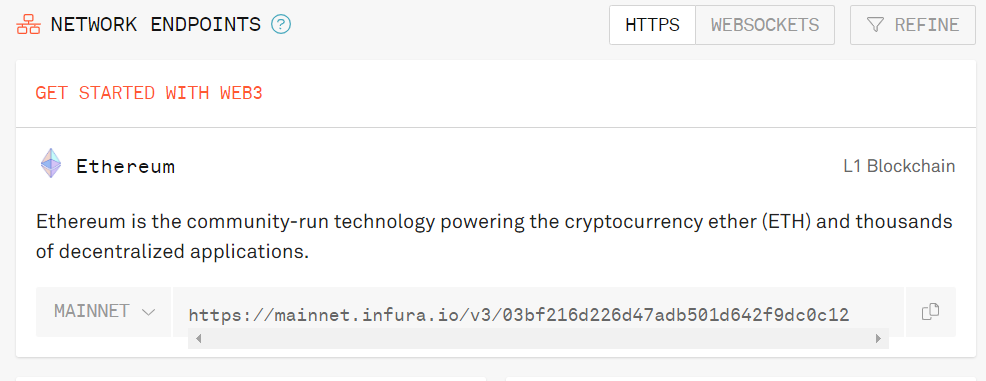
So we will type:
ethclient.Dial(“https://mainnet.infura.io/v3/03bf216d226d47adb501d642f9dc0c12”)
- Next, we will store the return value of the Dial function. It has two possible values. One is the connection itself and the second one is the error that it may encounter. So, the above statement becomes
connection, err := ethclient.Dial(“https://mainnet.infura.io/v3/03bf216d226d47adb501d642f9dc0c12”)
- In Go, the error handling is a bit different than the rest of the programming languages. We have to check for the err variable stated and whether it has anything in it.
if err != nil {
log.Fatal (“Failed to make a connection to the Ethereum Node”, err)
So, if the error is not nil, we will just print that it failed to connect and we can pass the err itself to the log statement.
- In order to use concurrency within Go, we first have to create a context ‘context’. With the ‘context’ created, we will try to get a transaction from the Ethereum node. This will help in setting up a communication between Ethereum node and the application. To do so, we will write the following statements:
context := context. Background()
txn, pending, _ := connection.TransactionByHash (context, common.HexToHash (“0xbca59819540b55e32a9a422e44559df023c2951b97b50815fa029b67ffe2a4a7”)
In order to do so, I’m using Etherscan and visit a random transaction and copy the transaction hash and paste it in the statement.
- We have a couple of things returned. These are the txn, pending flag (which is a boolean flag). If the pending flag is true, this means that the transaction is pending and if it’s false, it means that it’s not pending. For this, we will apply the if-else statement.
1
2
3
4
5
6
if pending {
fmt.Println(“The transaction is pending”, txn)
} else{
fmt.Println(“Transaction is not pending”, txn)
}
}- If it is pending, then we will print out a statement along with the txn. In case the condition is not met, then we print out that the Transaction is not pending along with txn.
Now, if you want to see the output, you will get to see:

Hopefully, you were able to understand the concept clearly. This is how you establish a connection with Ethereum using the programming language of Go. The process is quite simple if you understand the logic behind every step. And if you want to have a firm grasp of the concept, then you should focus on the coding. With more practice, you will definitely gain proficiency.


Build Your Golang Team