How to Implement Reader-Writer Locks in Golang?


This is a very interesting topic, and in this blog, we will get to see the implementation of reader-writer locks. If you are building a web app with Golang, then you will definitely be writing concurrent code using goroutines and channels. So, in this regard, locks become crucial for "go web development."
What Are Locks in Golang?
- The concept of locks is applicable to various programming languages, and not only Golang. In cases of intricate programs, locks (which protects access to important data) might lead to extra overheads. Then developers have to optimize it. And one of the most frequent ways to optimize it is the reader-writer locks.
- Go already consists of a fantastic implementation of reader-writer lock, i.e, sync.RWMutex. Furthermore, Go is one of the most ideal languages to understand locks as it has a great support for concurrency and a plethora of building blocks available in the standard library. We will delve into that concept in this tutorial.
What is the Purpose of Having Reader-Writer Locks?
- Multiple threads can read shared data simultaneously as long as no one is changing that data while it is being read. This is how reader-writer locks are developed.
- Since regular locks don't differentiate between "lock for reading" and "lock for writing," any thread that is reading data will still need to lock it, resulting in unnecessary serialization.
- Now, if one has to make a required exclusion between readers and writers, it leads to the unwanted exclusion between different readers. And this is where the RW locks play a pivotal role. They do not rely on a single lock mechanism.
Meanwhile, if you wish to get a web app with Golang developed, you should not hesitate in reaching out to the developers at Golang.Company. They will assist you in building a high performance, scalable, and robust app. And they will help you with the deployment process as well.
How to Implement Mutexes within the Go Programming Languages?
- From the title, you might not understand much. But, essentially we will take a look at race conditions and how you can circumvent them using mutexes. The race conditions lead to unexpected issues that are pertinent with new systems, where it is extremely hard to debug and fix issues.
- So, in this blog, we will write a Go program from the start that can execute concurrently in a safe manner without impacting the performance. And this is where the Mutual Exclusion or Mutex comes into play.
What is Mutex?
Mutex is a mechanism that enables us to prevent concurrent processes from making an entry into a critical section of code that has already been executed by another given process.
Let’s Create a Directory
- In order to get started, let us create a directory first. For this, we have to go to Command Prompt. Or if you are on Linux or macOS, then you have to use Terminal. Let us name this directory ‘mutex’. So we’ll type:
cd go-workspace
mkdir mutex
cd mutex
code .
Programming in VS Code
The whole program is available on Github at https://github.com/GolangCompany/reader-writer-locks.
As soon as we progress to VS Code, we create a Go source file named ‘main.go’. Here, we will type the main logic of the program. But, first let us get into the context of the program.
Context:
- Suppose there is a customer with a bank balance of $1000. The customer then tries to add another $500 to his account. In this case one goroutine would see the transaction, read the value of $1000 and then proceed to add $500 to the bank balance.
- Now imagine at the same moment, a charge of $600 has to be paid by him as mortgage. And the second process will read the initial value of the account as $600, before the first is able to deposit an additional amount of $500.
- Following this, it proceeds to subtract the $600 from the $1000. When the customer checks the bank balance the next day, and notices that he is down to $400. This is because the second process was unaware of the first deposit, and overruled the value upon completion of the second goroutine.
- Now that we are aware of the issue, let us try to address it with the help of a mutex.
1
2
3
4
5
6
7
8
9
10
11
12
13
14
15
16
17
18
19
20
21
22
23
24
25
26
27
28
29
30
31
32
33
package main
import (
“fmt”
“sync”
)
var (
mutex sync.Mutex
amount int
)
func deposit(value int, wg *sync.WaitGroup) {
mutex.Lock()
fmt.Printf(“Depositing %d to the account with balance %d\n”, value, amount)
amount += value
mutex.Unlock()
wg.Done()
}
func extract(value int, wg *sync.WaitGroup) {
mutex.Lock()
fmt.Printf(“Withdrawing %d from account with balance %d\n”, value, amount)
amount -= value
mutex.Unlock()
wg.Done()
}
func main() {
fmt.Println(“Hello Everyone”)
amount=1000
var wg sync.WaitGroup
wg.Add(2)
go extract(600, &wg)
go deposit(500, &wg)
wg.Wait()
fmt.Printf(“New Balance %d\n”, amount)
}
- Ok, so we have a lot to catch up from this program. So, we just imported two packages. These are sync and fmt. The sync package consists of the mutex and WaitGroups.
- Next, we define a mutex. In this regard, I’ve used global variables. We have mutex of type sync.Mutex and amount of type int. We will just initialize the amount in the main function with 1000.
- Following this, I’ve defined two functions. The first function is the deposit and the second function is the extract.
Function Deposit
- In the deposit function, we pass a value of type int and a waitgroup, i.e, *sync.WaitGroup. The WaitGroup is essential in waiting for all the active goroutines to finish the process.
- We are going to start off by trying to attain the lock from the mutex mentioned in the var, by calling the .Lock() function.
- Next, we will print out what we are doing “Depositing %d to the account with balance %d, value, amount. As you can see we are passing the value and the amount.
- Then we will perform the calculations, so amount +=value.
- Once we are through the critical code execution, we will unlock the mutex, with mutex.Unlock().
- Finally, to let the Go program know that the goroutine has finished the execution, we will call wg.Done().
Function Extract
- The next function extract will take the value of type int and wg *sync.WaitGroup. This is very similar to the previous function. Again, we have to wrap the critical code within goroutine within a lock, i.e, mutex.Lock().
- Next, we will print out what we wish to accomplish by (“Withdrawing %d from account with balance %d”, value, amount)
- Next, we have to update the amount, so we will write
- amount -= value
- Then we will unlock the mutex with mutex.Unlock() and finally we will call wg.Done().
Main Function
- Next, we will come to the main function. And we will define the WeightGroup var wg sync.WaitGroup
- Then we will add to this WaitGroup wg.Add(2) and following this, we will create the two goroutines.
go extract(600, &wg)
go deposit(500, &wg)
- Next, we will block the main function until all the WeightGroups have completed. Finally, we are going to print out fmt.Printf(“New Balance %d\n”, amount). With this, we will run the program.
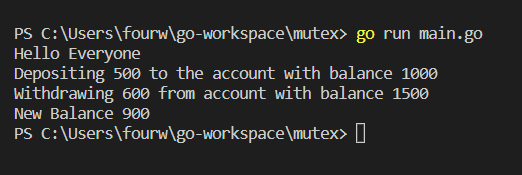
Output:
The BreakDown: Assessing What We Have Done Here
- Within both the extract and the deposit functions, we have clearly mentioned that the first step should be to acquire the mutex using mutex.Lock() method. Each of the functions will block until it successfully acquires the lock.
- Once it is successful, it will proceed to enter as a critical section and that will read and subsequently update the account balance (amount).
- Once each function has performed this task, it then proceeds to release the lock by calling mutex.Unlock().
- There are certain scenarios that you should be familiar with when you are working with mutex that you call unlock after you have developed the Goroutines that have acquired the lock. Irrespective of how the goroutines terminate, it has to call the unlock method. If you do not do so, then the program will be in a deadlock.
- Hopefully, you have understood the program, and the concept of mutex. And this is a simple way of implementing the reader-writer lock in Golang to handle the confidential information present in the goroutines. Once you have grabbed the concept, it is imperative that you try it out on your own in "go development" so that you can work on intricate projects later.


Build Your Golang Team