Guide to making a To-Do Application in Go Programming using Gin Framework


This blog is an explanatory blog that will give you an idea about how to create a todo application in Golang. My explanation will be through a simple project in which four APIs will be included for your todo app, i.e., POST, PUT, DELETE and GET. To test our application, I have used the Postman Application. I won’t be getting into the Front End explanation since the main focus for this blog will be the Back End and how you can make your code operational. But I will begin with the basics itself for a clear understanding. So let’s proceed with the project. But before that, please go through the prerequisites for a better understanding.
Prerequisites
Before proceeding with this tutorial, please ensure you are prepared with the requirements below so that you can easily grab the concepts.
- The first thing that is included in the list is the basic concepts of Golang also known as the Go Programming Language like Structs, Functions, Parameters, Arguments, Pointers, etc.
- You need to have Golang installed in your system. You can download it from the official website of Golang.
- You need to have an idea regarding API and RestAPI for better clarification.
- You need a database as well for your project, therefore for this project, I have MongoDB as my database. You can create an account in MongoDB Atlas.
- To test your application I won’t be using renderer instead, you need to download the Postman Application as I have mentioned in my introduction as well to test your APIs. whether they are executed or not.
- Lastly, if you're looking to join a Golang company, You need an IDE to write your code, I use Visual Studio Code to write my code. I suggest the same for you since it’s popular, easy to operate, and widely used by developers around the globe.
So after preparing with these prerequisites, you can proceed towards writing and executing your code.
Creating the project directory
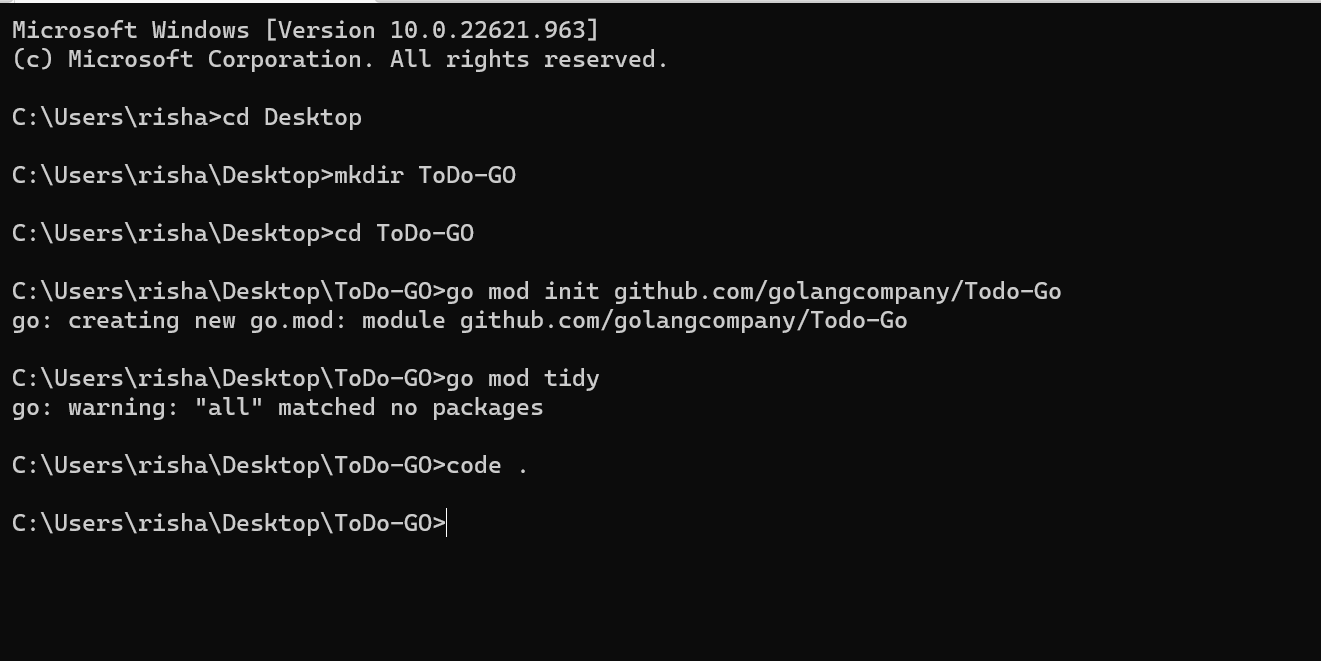
The first step,, to begin with, you need to create your project directory where your project essentials will be stored. So to create your directory first open your command prompt, then type the command “cd D” and press the Tab button on your keyboard which will complete your line of command i.e., cd Desktop. You can refer to Image 1 for a proper understanding. Then you need to create a directory for your project therefore the command you need to input for this is “mkdir ToDo-Go” (Here ToDo-Go is my directory name). Now after this, you need to import the mod file in your main directory for that you need to write, ‘go mod init “github.com/golangcompany/ToDo-Go”’.
[Image 1]
Next, the final step for this section would be to open up the code editor for that you can push the command as “code .” in your command prompt that will pop up the code editor on your screen i.e., Visual Studio Code Editor in my case.
Directory Structure
Here directory structure is nothing but the files and folders that you need to include in your main directory in order to structure up the project.

[Image 2]
Here, I have created four folders i.e., controllers, database, models, and routes. Our main directory will contain the mod files and main.go. So let us begin with our main.go file which will be the entry point for our program.
Starting with the main.go
1
2
3
4
5
6
7
8
9
10
11
12
13
14
15
16
package main

import (
    "github.com/gin-gonic/gin"
    routes "github.com/golangcompany/Todo-Go/routes"
)

func main() {
    port := "8000"

    router := gin.New()
    routes.Todo(router)

    router.Run(":" + port)

}
Here, in my main.go file, I have imported two packages i.e., Gin and routes. And stated my main function in which, I have directly defined the port and mentioned a variable named a router which has gin which asked to return a new blank Engine instance without any middleware attached.
Then, I called a function Todo from the routes package and passed it an argument called router then instructed to start the server. It takes a port number as an argument and listens on that port.
This is what is included in the main.go file. After closing the main function, we will proceed to build our routes. In the next section, you will find an explanation regarding routes and models.
Routes and Models
In this section, I will discuss the contents of the routes and models folder in our main directory of the project. Let us proceed with the routes folder first, which has the routes.go file in which I have defined the routes. Please follow the code below,
1
2
3
4
5
6
7
8
9
10
11
12
13
package routes

import (
    "github.com/gin-gonic/gin"
    "github.com/golangcompany/Todo-Go/controller"
)

func Todo(incomingRoutes *gin.Engine) {
    incomingRoutes.GET("/fetch", controller.FetchTodo())
    incomingRoutes.POST("/create", controller.CreateTodo())
    incomingRoutes.PUT("/update", controller.UpdateTodo())
    incomingRoutes.DELETE("/delete", controller.DeleteTodo())
}
Firstly, I have mentioned the package as routes and imported the basic required packages like Gin and controllers. Then the function Todo, which I have called previously in my main.go file has been defined in this file. Here, This is a function that takes in an object of type *gin.Engine and returns nothing. Its purpose is to register the routes for our application. This basically creates routes for the GET, POST, PUT and DELETE HTTP methods. It takes two parameters: the first one is the URL path and the second one is a handler function. I have called the functions FetchTodo, CreateTodo, UpdateTodo, and DeleteTodo that are present in the controllers. Now, It's time to work on the model files that will carry out the struct for my project.
1
2
3
4
5
6
7
8
9
10
11
12
13
14
package models

import (
    "time"

    "go.mongodb.org/mongo-driver/bson/primitive"
)

type TODOModel struct {
    ID        primitive.ObjectID `bson:"_id"`
    Title     string             `bson:"title" json:"title"`
    Completed string             `bson:"completed" json:"completed"`
    CreatedAt time.Time          `bson:"createAt" json:"created_at"`
}
In the models folder in my main directory, I have created a file named usermodels.go. In that file itself, I will be defining the struct. If you don’t know what exactly struct is then let me give you a glimpse about it. In Golang, a user-defined type called a struct or structure allows objects of potentially diverse types to be combined or grouped into a single type. Please refer to the code above for a clear understanding. Since my routes and models are ready, I will proceed with the database connection and controllers.
Database Setup
So let us understand how you can set up the database for your project. Before proceeding, as mentioned in the prerequisites you should have the MongoDB Atlas account ready with you so that you can fetch the connection string from it to get your application connected to your database.
In this section, I will guide you on how you can connect your application with MongoDB Database. First, refer to the code below, to have a clear vision regarding the concept.
1
2
3
4
5
6
7
8
9
10
11
12
13
14
15
16
17
18
19
20
21
22
23
24
25
26
27
28
29
30
31
32
33
34
35
36
37
38
package database

import (
    "context"
    "fmt"
    "log"
    "time"

    "go.mongodb.org/mongo-driver/mongo"
    "go.mongodb.org/mongo-driver/mongo/options"
)

func DBSet() *mongo.Client {
    client, err := mongo.NewClient(options.Client().ApplyURI("mongodb+srv://<Username>:<Password>@cluster0.0aeeqhe.mongodb.net/?retryWrites=true&w=majority"))
    if err != nil {
        log.Fatal(err)
    }
    ctx, cancel := context.WithTimeout(context.Background(), 10*time.Second)
    defer cancel()
    err = client.Connect(ctx)
    if err != nil {
        log.Fatal(err)
    }
    err = client.Ping(context.TODO(), nil)
    if err != nil {
        log.Println("Failed to Connect")
        return nil
    }
    fmt.Println("Successfully Connected to the Mongodb")
    return client
}

var Client *mongo.Client = DBSet()

func UserData(client *mongo.Client, CollectionName string) *mongo.Collection {
    var collection *mongo.Collection = client.Database("Cluster0").Collection(CollectionName)
    return collection
}
Firstly, I have imported the mongo driver package in order to run the code. Then I created a function called DBSet. In the first step, I mentioned the URI that has the MongoDB String init. Here, In the connection string, in place of the Username and Password, you need to mention the ID and password of your database cluster which you can fetch from MongoDB Atlas itself. If you aren’t aware of how to fetch the connection string or change your password, then you can refer to my previous blog. Then, I mentioned the timeout of 10 seconds following that I used defer to stop the execution if the program couldn’t establish a connection. Then I have instructed to check if the connection to the database is successful. It returns nil if it fails to connect and prints "Failed to Connect" in the console or if it succeeds then it prints Successfully connected to MongoDB and returns clients. I have declared a variable named Client of type *mongo.Client. The value of the variable is set to the return value of the function DBSet(). Then I stated a function named UserData that returns a collection from the database. It takes two parameters, one is the client, and the other is the name of the collection. This was it, for the database setup, now in the next section, I will explain the controllers, which are a very important part of this project.
Building Controller
Now, In this section, you will be getting guidance about how you can establish the controllers. In the controllers folder, I have created a file named controller.go in which, I have defined the four functions FetchTodo, CreateTodo, UpdateTodo, and DeleteTodo. Please refer to the code below to have a clear understanding of the packages you need to import.
1
2
3
4
5
6
7
8
9
10
11
12
13
14
15
package controller
import (
"context"
"fmt"
"net/http"
"time"
"github.com/gin-gonic/gin"
database "github.com/golangcompany/Todo-Go/database"
"github.com/golangcompany/Todo-Go/models"
"go.mongodb.org/mongo-driver/bson/primitive"
"go.mongodb.org/mongo-driver/mongo"
"go.mongodb.org/mongo-driver/bson"
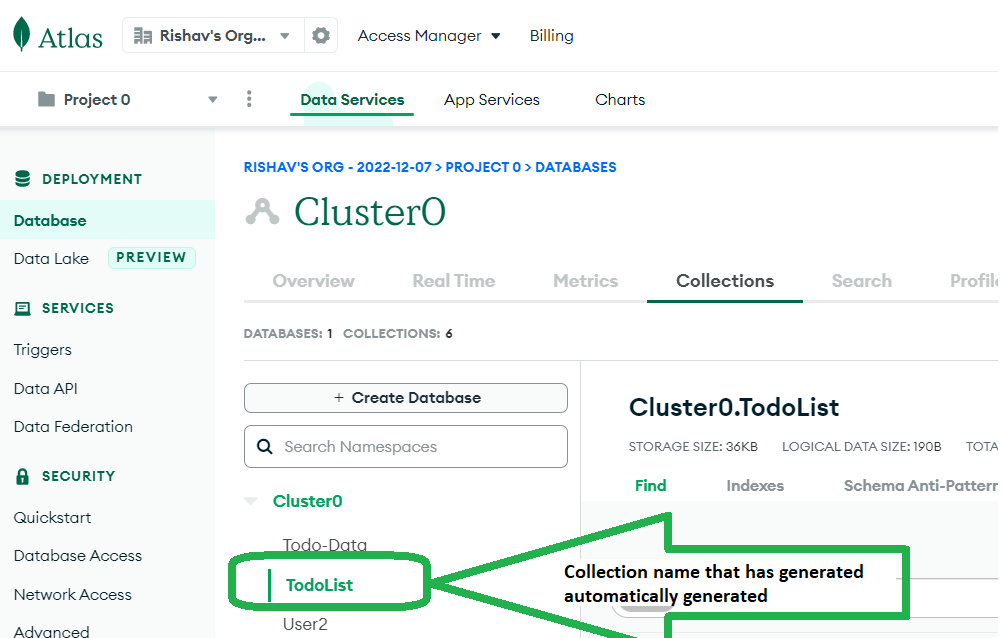
)After mentioning the imports in the controller.go, I have declared a variable TodoCollection of type mongo.collection. The value of the variable is the result of calling the function database.UserData with two arguments: database.Client and "TodoList". Here “TodoList” is nothing but the name of the collection that will be created automatically in your database named as TodoList (Please Refer to Image 3).
varTodoCollection*mongo.Collection= database.UserData(database.Client,"TodoList")
Next, I created a variable and named it to todo with the datatype of the struct which I had created on the models page.
[Image 3]
1
2
3
4
5
6
7
8
9
10
11
12
13
14
15
16
17
18
19
20
21
22
23
24
25
26
27
28
29
30
31
32
33
34
func FetchTodo() gin.HandlerFunc {
    return func(c *gin.Context) {
        var todo models.TODOModel

        var ctx, cancel = context.WithTimeout(context.Background(), 100*time.Second)
        defer cancel()

        id := c.Query("id")
        fmt.Println(id)
        if id == "" {
            c.Header("Content-Type", "application/json")
            c.JSON(http.StatusBadRequest, gin.H{"error": "Invalid id"})
            c.Abort()

        }

        fmt.Println("")

        ID1, err := primitive.ObjectIDFromHex(id)
        if err != nil {
            c.IndentedJSON(500, "Internal Server Error")

        }
        fmt.Println(ID1)
        err = TodoCollection.FindOne(ctx, bson.M{"_id": ID1}).Decode(&todo)

        if err != nil {
            c.IndentedJSON(500, "Internal Server Error")
            fmt.Println("Here is your task")
            c.Abort()
        }
        c.IndentedJSON(200, todo)
    }
}
Then I will proceed in writing our first function in controllers i.e., FetchTodo which will fetch the Todo from our database with the help of its ID. In this function, I have created a context with a 100 seconds timeout and used defer after it. Then I have stated the id which will run a query to identify the todo and check if the id is empty or not. If it's empty, then it returns an error message (Invalid id) and aborts the process. Next, I have stated ID1 which converts the id from hex to ObjectID. Then, I stated the err that fetches a todo from the database. Here If you observe, I have used the FindOne method on the TodoCollection object and passes in two arguments: ctx and bson.M{"_id": ID1}. if theres an error then the system responds with a 500 code and if there is no error then it prints “Here is your task”. Now let me explain the CreateTodo function. Please refer to the code below,
1
2
3
4
5
6
7
8
9
10
11
12
13
14
15
16
17
18
19
20
21
22
23
24
func CreateTodo() gin.HandlerFunc {
    return func(c *gin.Context) {
        var todo models.TODOModel
        var ctx, cancel = context.WithTimeout(context.Background(), 100*time.Second)
        defer cancel()
        todo.ID = primitive.NewObjectID()
        err := c.BindJSON(&todo)
        if err != nil {
            fmt.Println(err)
            c.IndentedJSON(500, "Unable to BindJSON,")
            fmt.Println("Todo Binded")
            c.Abort()
        }

        _, err = TodoCollection.InsertOne(ctx, todo)

        if err != nil {
            c.IndentedJSON(500, "Internal Server Error")
            fmt.Println("Your Todo has been listed")
            c.Abort()
        }
        c.IndentedJSON(200, todo)
    }
}
In this function, everything remains the same till context but after that, since my intention is to create new todo with this function, I have used primitive which will generate unique object ids for my todos whenever the client creates it. I have used the BindJSON function here, which takes the data from the request and binds it to the todo variable or our struct. If there is an error, it prints out the error message and aborts the request. If there's no error then it will insert the data into the database, for this reason, I have used InsertOne and after this, if there is no error caught the program will print “Your Todo has been listed”. This is how you can write the code for the CreateTodo function. Now, I will be heading for my UpdateTodo function and DeteleTodo Function. The DeleteTodo function is similar to the CreateTodo function; it just deletes a task from the database. It takes in an id and deletes the corresponding task. Please refer to the code below,
1
2
3
4
5
6
7
8
9
10
11
12
13
14
15
16
17
18
19
20
21
22
23
24
25
26
27
28
29
30
31
32
33
34
35
36
37
38
39
40
41
42
43
44
45
46
func UpdateTodo() gin.HandlerFunc {
    return func(c *gin.Context) {
        var updateproduct models.TODOModel

        var ctx, cancel = context.WithTimeout(context.Background(), 100*time.Second)
        defer cancel()
        if err := c.BindJSON(&updateproduct); err != nil {
            c.JSON(http.StatusBadRequest, gin.H{"error": err.Error()})
            return
        }
        id := c.Query("id")
        if id == "" {
            c.Header("Content-Type", "application/json")
            c.JSON(http.StatusBadRequest, gin.H{"error": "Invalid id"})
            c.Abort()

        }

        // fmt.Println(updateproduct.Title)

        ID1, err := primitive.ObjectIDFromHex(id)
        if err != nil {
            c.IndentedJSON(500, "Unable to Hex encode")

        }

        // fmt.Println(ID1)
        // filter := bson.D{primitive.E{Key: "_id", Value: ID1}}
        filter := bson.M{"_id": ID1}
        update := bson.D{{"$set",
            bson.D{
                {"title", updateproduct.Title},
                {"completed", updateproduct.Completed},
            }}}

        _, err = TodoCollection.UpdateOne(ctx, filter, update)
        // fmt.Println(abc)
        if err != nil {
            c.IndentedJSON(500, err)
            // fmt.Println("errorhai")
            c.Abort()
        }

        c.IndentedJSON(200, "Successfully updated the todo list")
    }
}
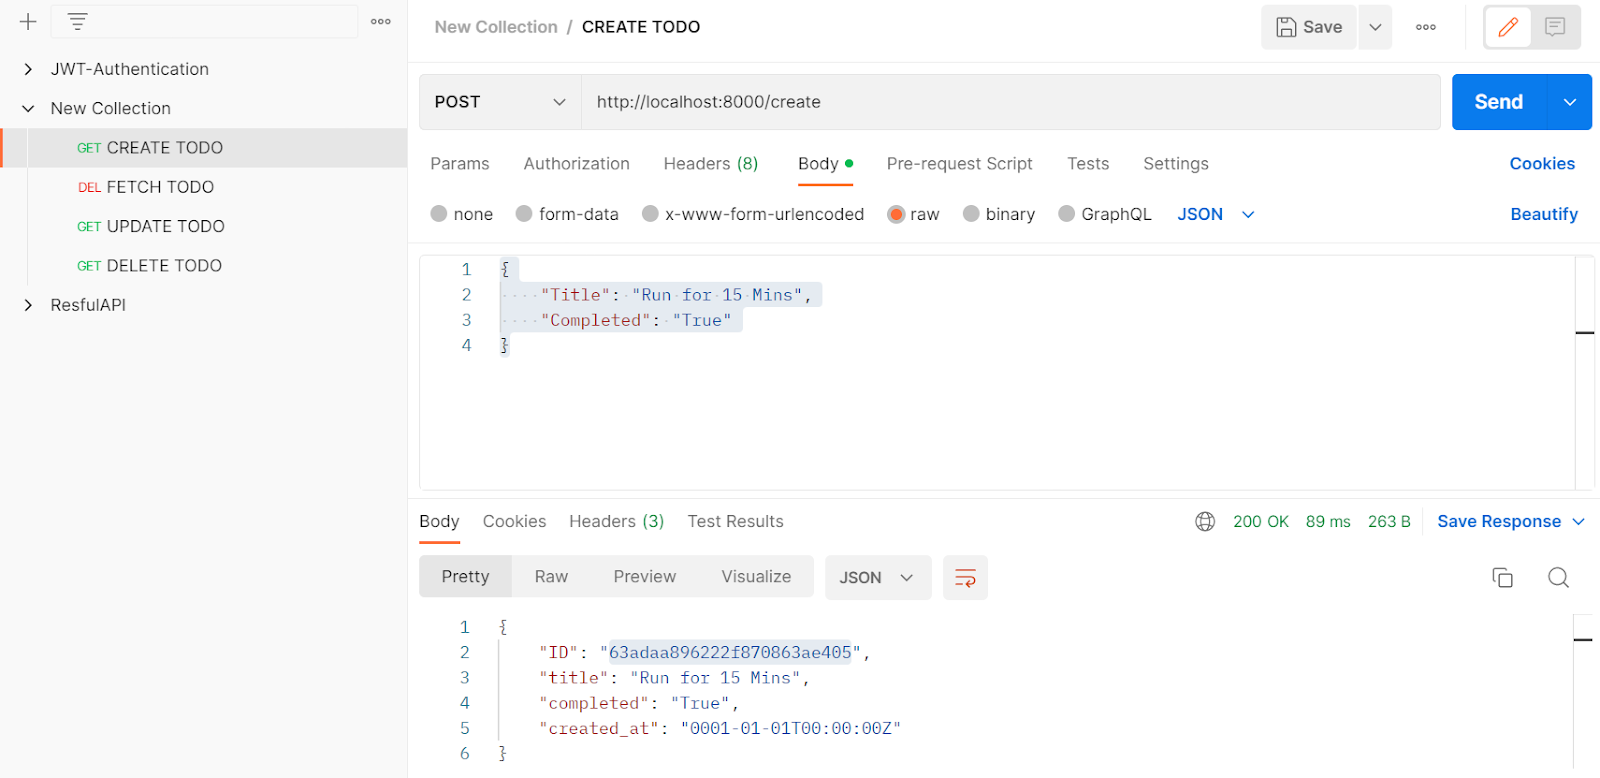
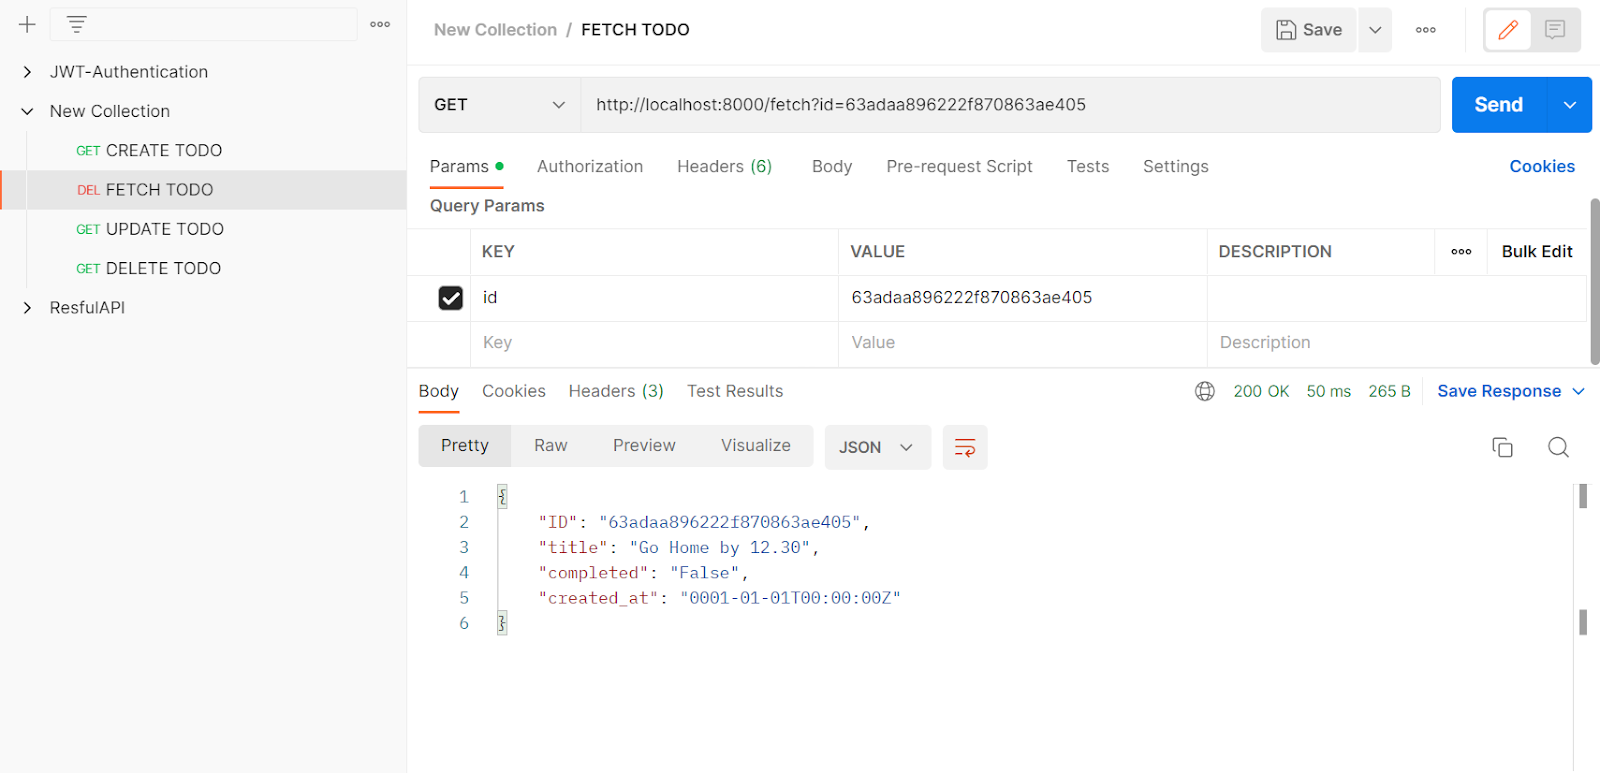
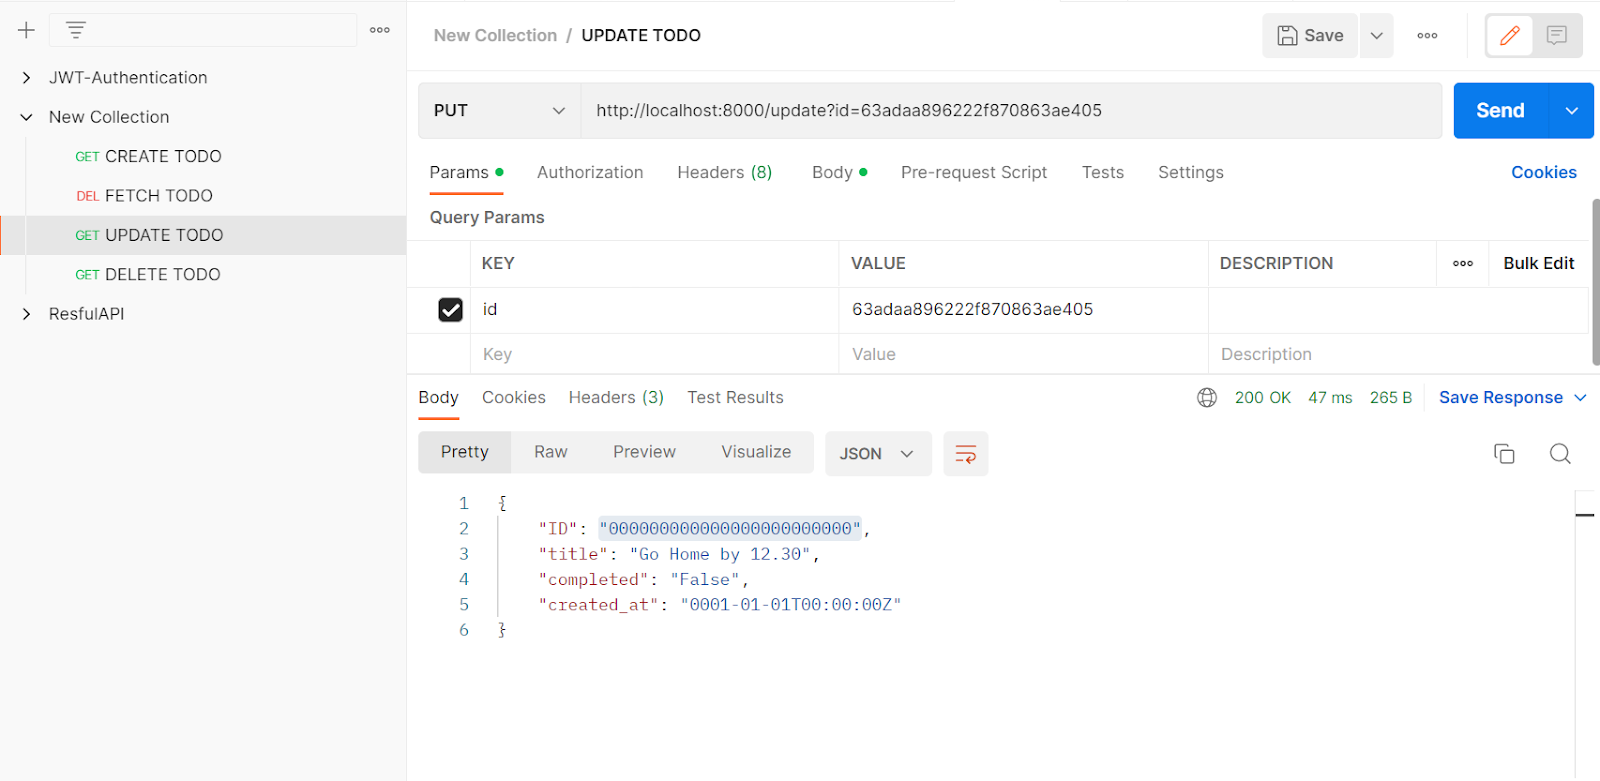
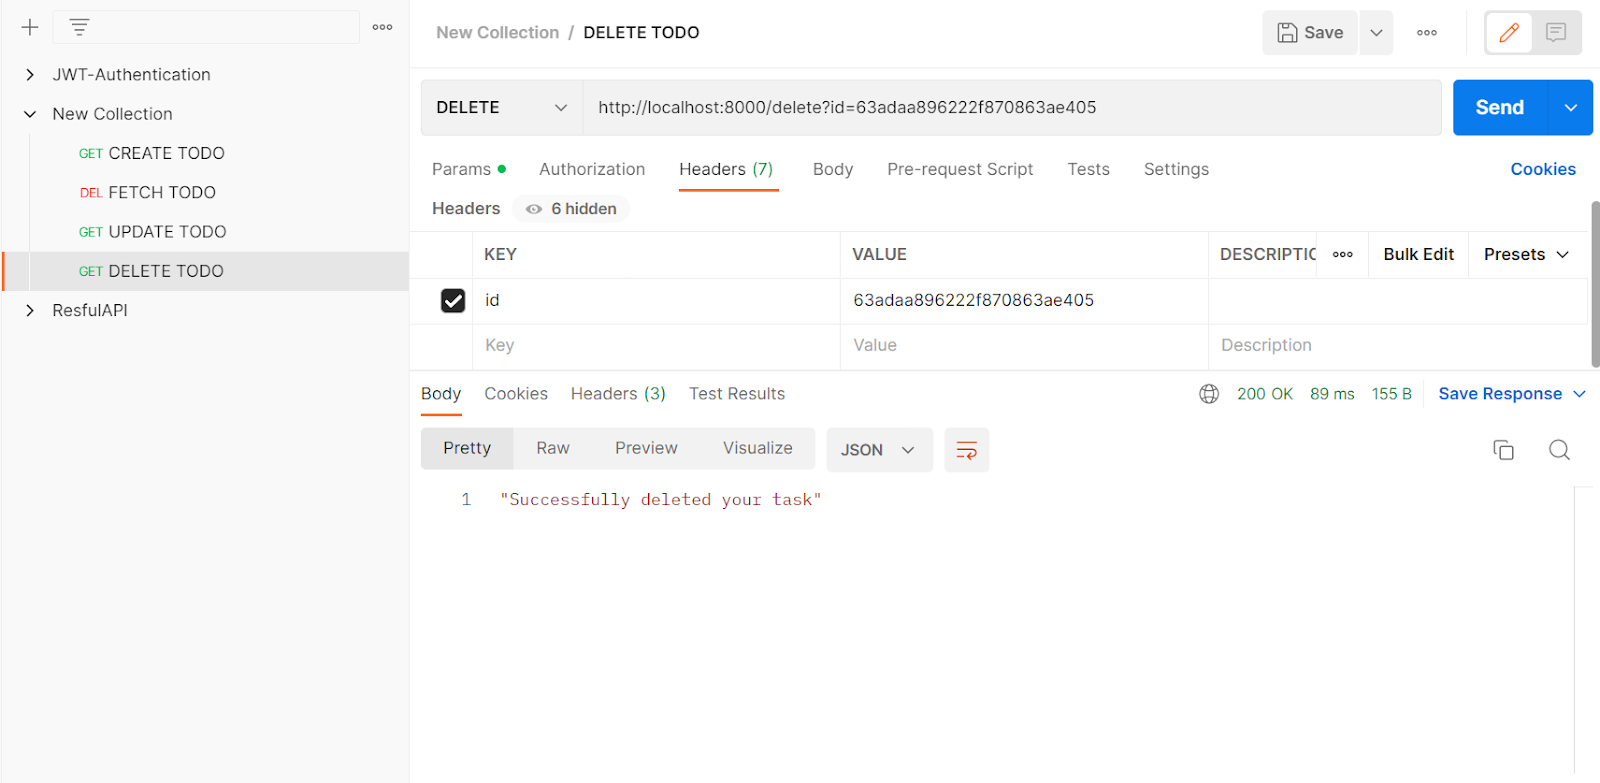
Now, you need to Hit the APIs to check your ToDo Application, for that you need to use the Postman Application. I have listed some Images of my Postman Application testing below for your reference so that it can make your task of testing more convenient. Hope you will get some outcome from this tutorial blog. Since this blog doesn’t only give the knowledge regarding how to build todo application but it may give you a broader idea of the usecases for this language like for golang mobile development, game development, etc. So keep learning and Happy Coding!
[Image 5]
[Image 6]
[Image 7]


Build Your Golang Team