Create Rest API using Gin Web Framework in Golang


This blog will teach you how to create an API in Golang (Go). Moving ahead, you will understand the basic concept of API, and how you can create it in Golang. Before proceeding, you should have the postman application installed and an account created in it since at the end of the project you need to check whether your API is functioning properly or not. I will create three functions in my code to initialize the program i.e., “Create User”, “Get User” and “Delete User”. After writing down the code I will also explain how to check whether your program is initialized correctly. I have mentioned the prerequisites below,
Prerequisites
- Download the Postman Application to check your program initialization.
- MongoDB Atlas (with an active user account)
- IDE - VS Code Editor.
Gin Web Framework
For this project, I will use Gin Web Framework. Several web frameworks can be imported to perform API creation. For Example
- Net/HTTP
- Gorilla Mux
- Gin
- Go Fibre
Here, net/http is the default package through which we can initialize our program. Net/http provides HTTP client and server implementations. Other than net/http, Gorilla Mux and Gin are the two frameworks that you can use to create an API in Golang. Here, I am using the Gin Framework since it is fast, the codes are short, and more than that I feel comfortable with this framework.
What is a RestAPI?
As known, API stands for Application Programming Interface. Here, API is a method through which the front end or the client communicates with the backend server, and it's a one-way conversation. This conversation follows some protocols or methods known as HTTP Methods or Protocols.
If there's two-way traffic/conversation then it is known as Web Socket. This topic is not useful in our project, therefore we will discuss this in some other blog. For now, There are four types of HTTP Methods i.e., "golang development company" you can consider for your project.
- GET
- POST
- PUT
- DELETE
Writing the Code
Packages Required for our Program
Before proceeding you need to understand what packages you need to import. Therefore let's list the packages that are required for our project. Below are the package links,
“github.com/gin-gonic/gin”
“go.mongodb.org/mongo-driver”
“go.mongodb.org/mongo-driver/bson/primitive”
“go.mongodb.org/mongo-driver/options”
There are other packages as well that you need to execute your program which I will discuss later in this blog.
Setting up the Workspace
To begin with we need to create the directory for our project therefore we will input some commands in the command prompt (windows) that will create a directory for your project.
“cd Desktop”
“mkdir RestfulAPI”
“cd RestfulAPI”
“code .”
After entering the last command i.e., “code .” the IDE will pop up on your screen. For this blog, I am using VS Code Editor as I have mentioned above. After the creation of your workspace, you need to install the go mod file through your VS Code Terminal. for which the command is “go mod init github.com/(Your Github Username)/(Directory Name)” in my case, it is “go mod init github.com/golangcompany/RestfulAPI”. Then following this you need to input “go mod tidy”. After all the basic imports, you need to import the packages that I have discussed above i.e, Gin Framework and Mongo Driver by giving the command “go get (Package Link)”
Getting Started on IDE
In this section, I will begin with my explanation of the code on IDE i.e., on VS Code Editor. Here you need to begin by creating three folders i.e., controllers, database, and models.
In controllers basically, you will define your 3 functions for CreateUser, GetUser, and Delete User. The database will store the string for the database in which you want to push your data and handle the database functions. For this tutorial, I have already mentioned that it is going to be MongoDB. The final folder i.e., models will carry out the struct “User”. Apart from these folders, we will begin with the “main.go” file which will be placed in your main directory.
1
2
3
4
5
6
7
8
9
package main

import (
    "log"
    "os"

    "github.com/gin-gonic/gin"
    "github.com/golangcompany/restfulapui/controllers"
)
You need to begin with “package main” and import the packages mentioned in the image above.
Implementation of Router
Here you will define the func main and mention the port for the establishment of the connection with the server. To understand further you need to get an idea of what a router is in Golang and what is the use case of a router.
Here in func main, you have to get the env method to fetch a port that is available in the dev system. Following that, I have also mentioned that if the program is unable to fetch any port then it will use 8080 as its port to establish the connection to the server.
In my code, I have used gin as the HTTP Web Framework. Here we are defining gin.New()as a variable router and asking it to use gin.Logger to log the process for records.
1
2
3
4
5
6
7
8
9
10
11
12
13
func main() {
    port := os.Getenv("PORT")
    if port == "" {
        port = "8080"
    }
    router := gin.New()
    router.Use(gin.Logger())

    router.POST("/user", controllers.CreateUser())
    router.GET("/user", controllers.GetUser())
    router.DELETE("/user", controllers.DeleteUser())
    log.Fatal(router.Run(":" + port))
}
Routing in Golang
In simple words, a router is present in the application and whenever a request is sent or asked to fetch from the front end, it connects with the router and then the router delivers back or returns the data. The process itself is known as routing. As you can see in the above code, I have created 3 routes i.e., POST, GET, and DELETE.
Now, let's see how you can create a Struct.
Creating Struct
Struct, also known as the structure, is the main field where different fields are stored in a single place. To make it more simple, let me give you an example.
Suppose you have a travel agency that offers rental cars to tourists with a chauffeur, so you will need different fields like vehicle registration number, vehicle model, seating capacity, vehicle chauffeur name, vehicle legal documents, etc, for your database, therefore, you can prepare a struct for it. In Golang, these are crucial integrations for simplifying the task of both the developer and the organization. Other languages have a different approach to these kinds of proceedings.
Grasping a concept in programming gets difficult without a sample code. Right? So, let’s understand the concept of building a Struct with a sample code syntax, given below.
This will make you learn about its convenience and capacity.
1
2
3
4
5
6
7
8
9
10
type User struct {
 ID	primitive.ObjectID `bson:"_id"`
 Veh. Reg.NO.  string    `json:"Veh. Reg.NO." bson:"Veh. Reg.NO."`
 Veh. Model	    string    `json:"Veh. Model" bson:"Veh. Model"`
 Veh. Odo.	    string    `json:"Veh. Odo." bson:"Veh. Odo."`
 Veh. SeatCap.  string   `json:"Veh. SeatCap." bson:"Veh. SeatCap."`
 Veh. Chauffeur string   `json:"Veh. Chauffeur" bson:"Veh. Chauffeur"`
 Veh. RC No.    string   `json:"Veh. RC No." bson:"Veh. RC No."`
 Veh. Year	    string    `json:"Veh. Year" bson:"Veh. Year"`
}
You can notice that I have entered different fields in a single place. This becomes convenient from a developer's perspective.
Hope this was helpful! Now, let us move toward our current project again.
I have not created a lengthy struct, In my code, I have included only four fields i.e., ID, Name, Gender, and Age. First, have a look at my struct before proceeding further.
1
2
3
4
5
6
7
8
9
10
11
package models

import (
    "go.mongodb.org/mongo-driver/bson/primitive"
)
type User struct {
    ID     primitive.ObjectID `bson:"_id"`
    Name   string             `json:"name" bson:"name"`
    Gender string             `json:"gender" bson:"gender"`
    Age    int                `json:"age" bson:"age"`
}
Here, I will begin by writing package models and importing “go.mongo.org/mongo-driver/bson/primitive”. I have imported the “primitive” package since I want the id to be unique every time we post user data in our database. Next, you need to mention the fields and the data type.
Now, let us proceed toward our database.go file where we will set up our database and mention the MongoDB Clusters string.
If you don’t know about it you can visit this page to get an idea about how to connect your Golang App with MongoDB Atlas.
Establishing Controllers
Here, in this section, you will learn about the three main functions through which the client will hit the API.
First, get used to the basic imports like context, fmt, net/http, and time. Further for program initialization, you need to add gin framework, mongo-driver, and gopackage-bson.
1
2
3
4
5
6
7
8
9
10
11
12
13
14
15
package controllers

import (
    "context"
    "fmt"
    "net/http"
    "time"

    "github.com/gin-gonic/gin"
    "github.com/golangcompany/restfulapui/database"
    "github.com/golangcompany/restfulapui/models"
    "go.mongodb.org/mongo-driver/bson/primitive"
    "go.mongodb.org/mongo-driver/mongo"
    "gopkg.in/mgo.v2/bson"
)
Now you need to focus on the three main functions of our API i.e., CreateUser, GetUser, and DeleteUser. But before that,
1
2
var UserCollection                       *mongo.Collection               =
database.UserData(database.Client, "User2")
We will write a variable named UserCollection. It instructs the program to create a database named User2.
Then, you need to begin with the first function in controllers i.e., CreateUser.
1
2
3
4
5
6
7
8
9
10
11
12
13
14
15
16
17
18
19
20
func CreateUser() gin.HandlerFunc {
    return func(c *gin.Context) {

        var ctx, cancel = context.WithTimeout(context.Background(), 100*time.Second)
        defer cancel()
        var User models.User

        if err := c.BindJSON(&User); err != nil {
            c.JSON(http.StatusBadRequest, gin.H{"error": err.Error()})
            c.Abort()
        }
        User.ID = primitive.NewObjectID()
        _, inserterr := UserCollection.InsertOne(ctx, User)
        if inserterr != nil {
            c.JSON(http.StatusInternalServerError, gin.H{"error": "not created"})
            c.Abort()
        }
        c.IndentedJSON(200, "user created successfully")
    }
}
This is a function that returns a gin handler function. This means it can be used as an HTTP handler in the Gin framework. In the next line, you will take two variables, i.e., ctx and cancel. This line creates a context with a timeout of 100 seconds. This is used to prevent the function from running forever if there's an error.
As you can see in my code, I have also mentioned primitive when a new user is created, it will always get stored in the database with a unique object ID.
Now let's proceed toward GetUser Function and DeleteUser Function,
1
2
3
4
5
6
7
8
9
10
11
12
13
14
15
16
17
18
19
20
21
22
23
24
25
26
27
28
29
30
31
32
33
34
35
func GetUser() gin.HandlerFunc {
    return func(c *gin.Context) {
        var User models.User

    var ctx, cancel = context.WithTimeout(context.Background(), 100*time.Second)
        defer cancel()
        id := c.Query("id")
        if id == "" {
            c.Header("Content-Type", "application/json")
            c.JSON(http.StatusBadRequest, gin.H{"error": "Invalid id"})
            c.Abort()

        }

        fmt.Println("heelol")
        fmt.Println(id)

        ID1, err := primitive.ObjectIDFromHex(id)
        if err != nil {
            c.IndentedJSON(500, "Internal Server Error")

        }
        fmt.Println(ID1)

        err = UserCollection.FindOne(ctx, bson.M{"_id": ID1}).Decode(&User)


        if err != nil {
            c.IndentedJSON(500, "Internal Server Error")
            fmt.Println("Am I Here?")
            c.Abort()
        }
        c.IndentedJSON(200, User)
    }
}
With GetUser Function, you can fetch the user details from the database. Also with DeleteUser Function, you can command the program to delete the user details from the database.
The initial steps of the GetUser Function and the DeleteUser Function will be the same as the CreateUser function. With the DeleteUser function, you can return a gin handler function which is used as an HTTP handler in the Gin framework. I have created a context with a timeout of 100 seconds.
Following that, you need to take the variable id where the query method is implemented and if there's no id matching in the database it will show you an error. On the other hand, if it succeeds, then using the ObjectIDFromHex method the id will be converted from hex to object id. The FindOne method will find the user id in the database and decode it and if the error is nil, it will provide the user data to the client.
1
2
3
4
5
6
7
8
9
10
11
12
13
14
15
16
17
18
19
20
21
22
23
24
25
func DeleteUser() gin.HandlerFunc {
    return func(c *gin.Context) {

        var ctx, cancel = context.WithTimeout(context.Background(), 100*time.Second)
        defer cancel()
        id := c.Query("id")
        if id == "" {
            c.Header("Content-Type", "application/json")
            c.JSON(http.StatusNotFound, gin.H{"error": "Invalid id"})
            c.Abort()
            return
        }

        ID1, err := primitive.ObjectIDFromHex(id)
        if err != nil {
            c.IndentedJSON(500, "Internal Server Error")
        }

        _, err = UserCollection.DeleteOne(ctx, bson.M{"_id": ID1})
        if err != nil {
            c.IndentedJSON(500, "Internal Server Error")
        }
        c.IndentedJSON(200, "Successfully deleted")
    }
}
Here, as you can see in my code, for DeleteUser, the overall process is similar to GetUser. The difference lies in where I used the FindOne method to find the user id in our database and decoded it. Rather than using the FindOne Method, you need to use DeleteOne Method. The decode method is not necessary in this case since I don’t want to fetch the body of the data.
Outcome
In this section, I will show the output through the Postman application with the help of some screenshots. First, let’s run the program with the command “go run main.go”.
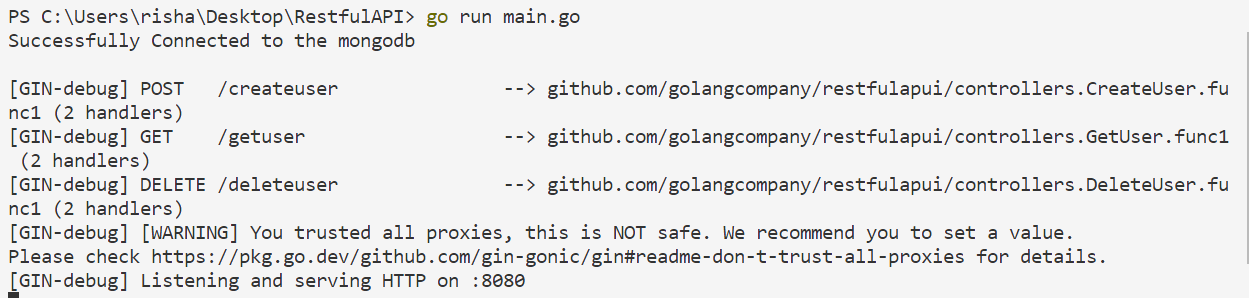
[Image 1]
Here you may encounter a dialog that may ask your permission for access. After approval the permission, you need to get on the postman application to verify whether the API is working properly.

[Image 2]
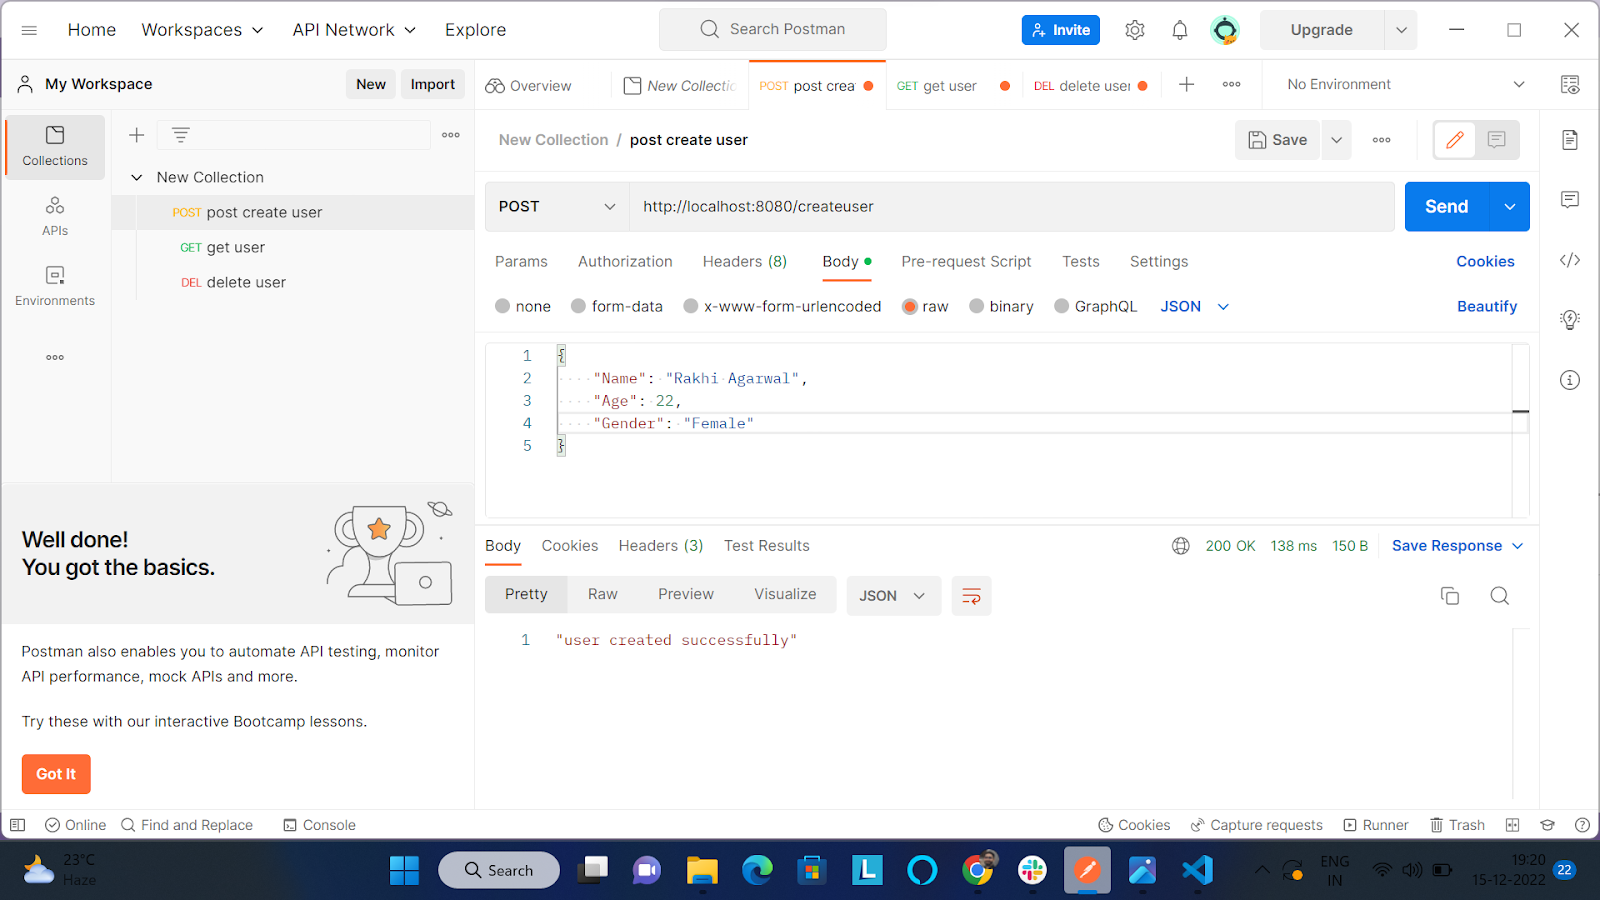
Here in the postman application, first I will check the POST API. For this, you have to enter the address as http://localhost:8080/createuse and select ‘raw’.
Next, I entered the data that I want to post in my database and select the form as JSON and click on send which gives us the message ‘user created successfully’. This is the confirmation that our data is posted in our database.
[Image 3]
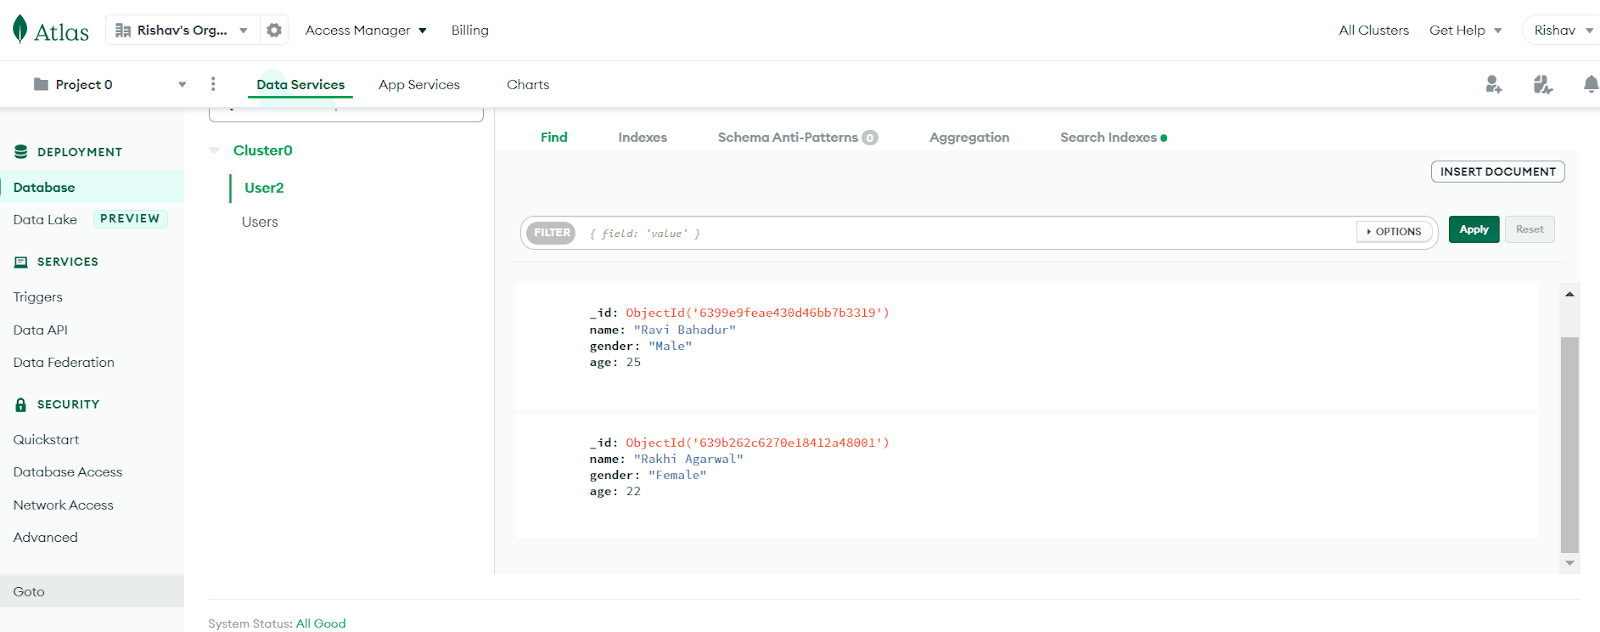
Now let’s check our data in our MongoDB Cluster.
[Image 4]
As you can see, the data we have tried to insert is present in our cluster with a unique object id.
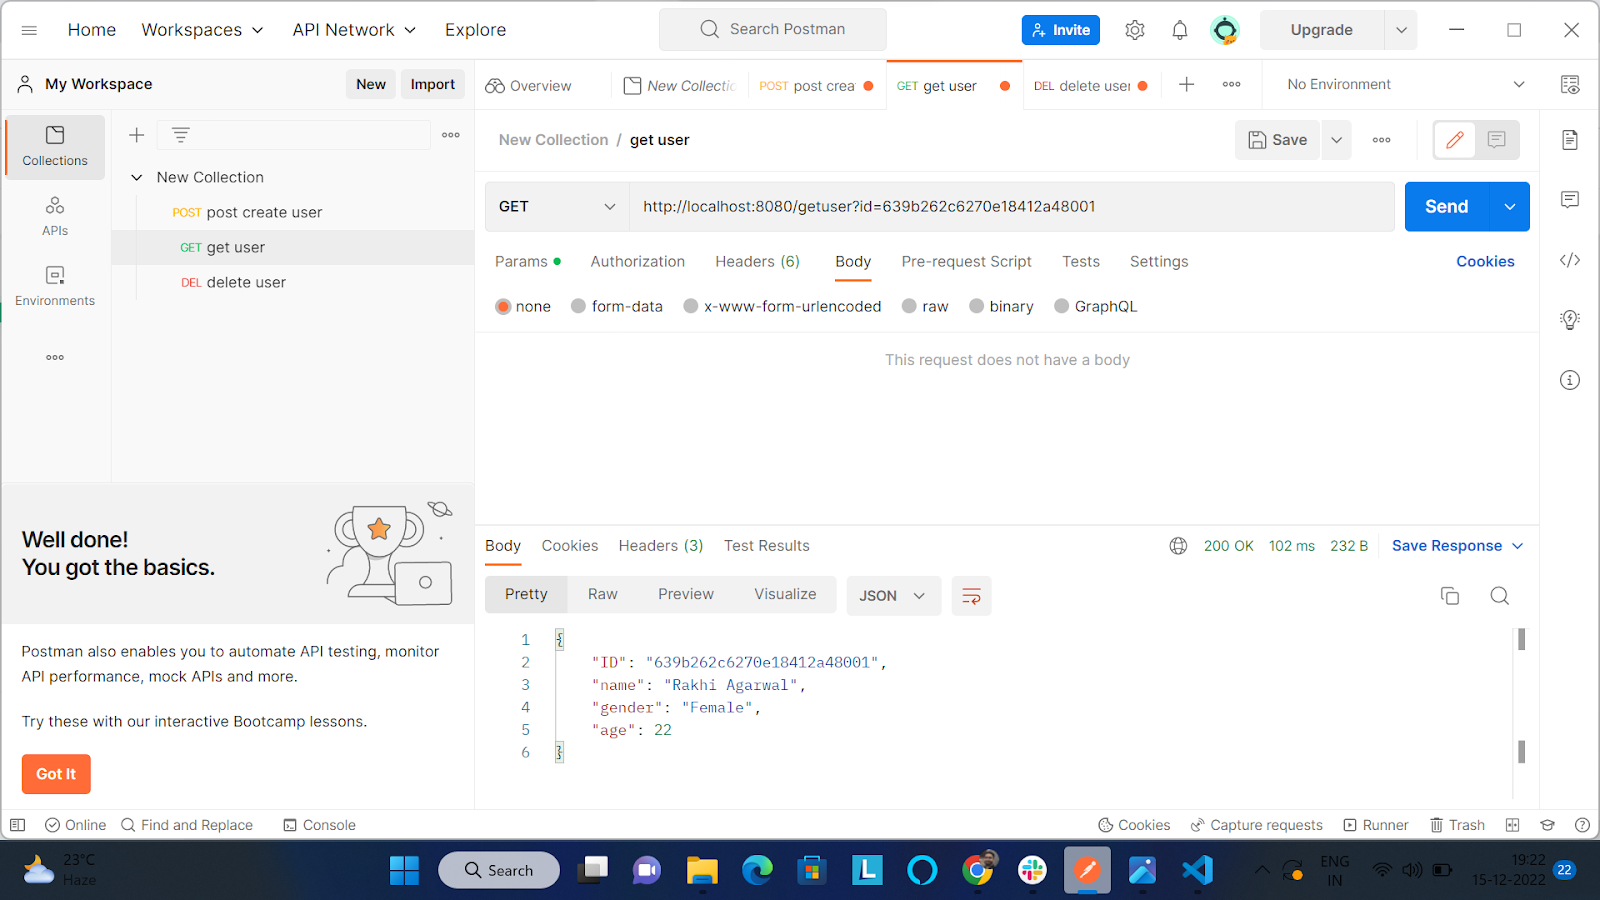
Now, I need to check the GET API. For that, you have to select GET and enter the URL, http://localhost:8080/getuser?id=639b262c6270e18412a48001 (we have entered the id), and click on send.
[Image 5]
As you can observe from the image above that it fetched and showed the data against the particular id which I have entered along with the URL.
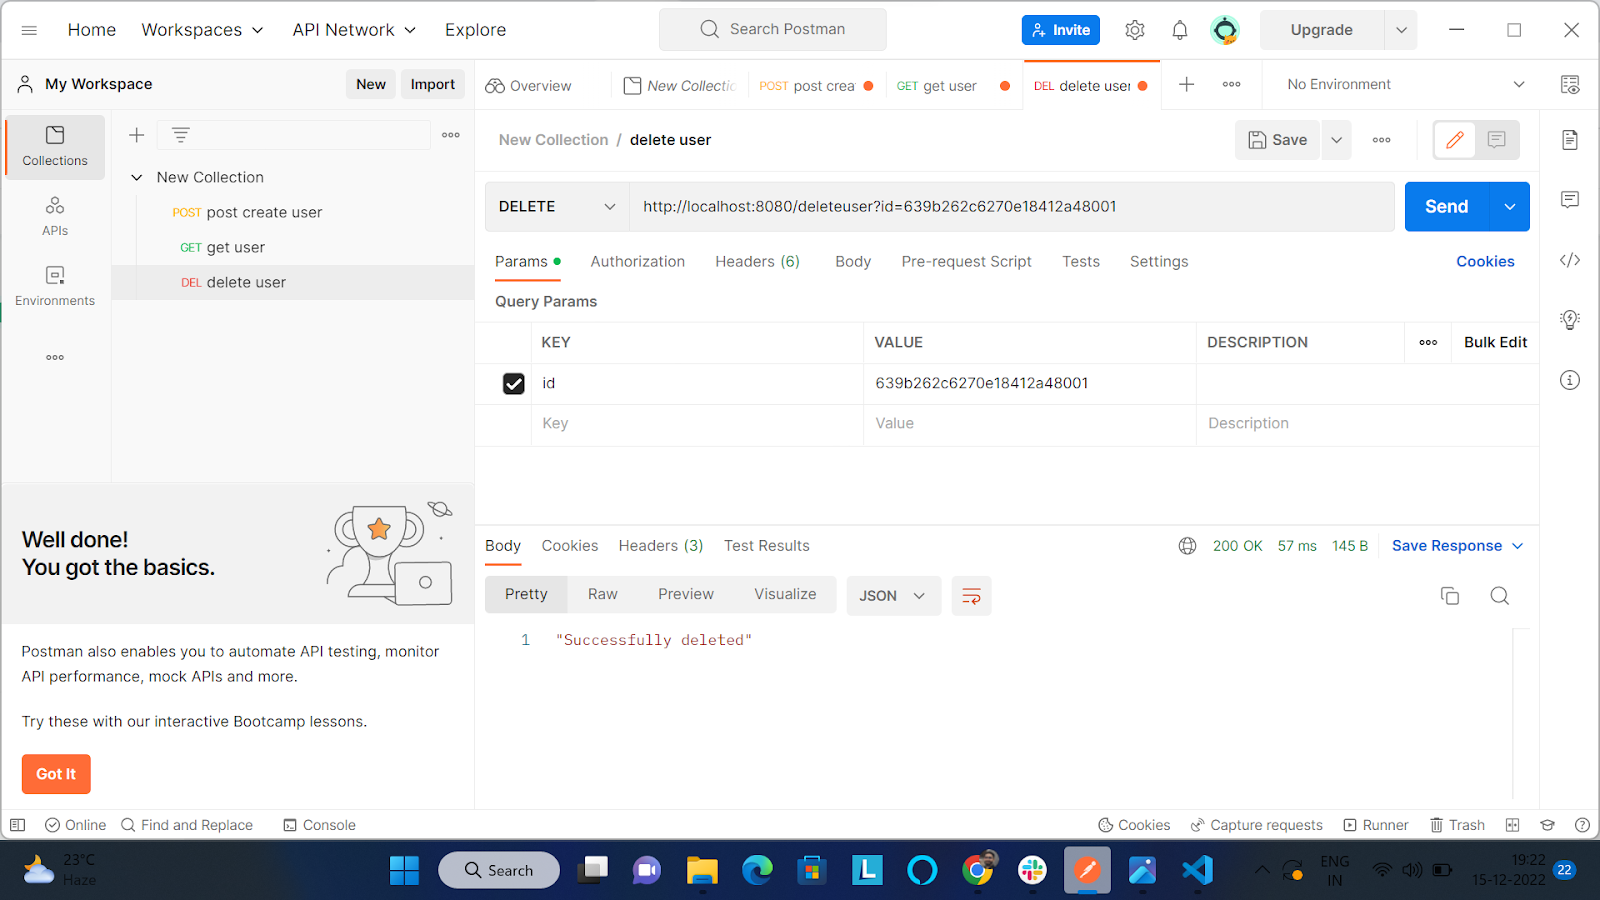
Finally, I will check the DELETE API. For that, you have to select DELETE and enter the URL with the ID in it. When I click on send, it returns a message “Successfully deleted”.
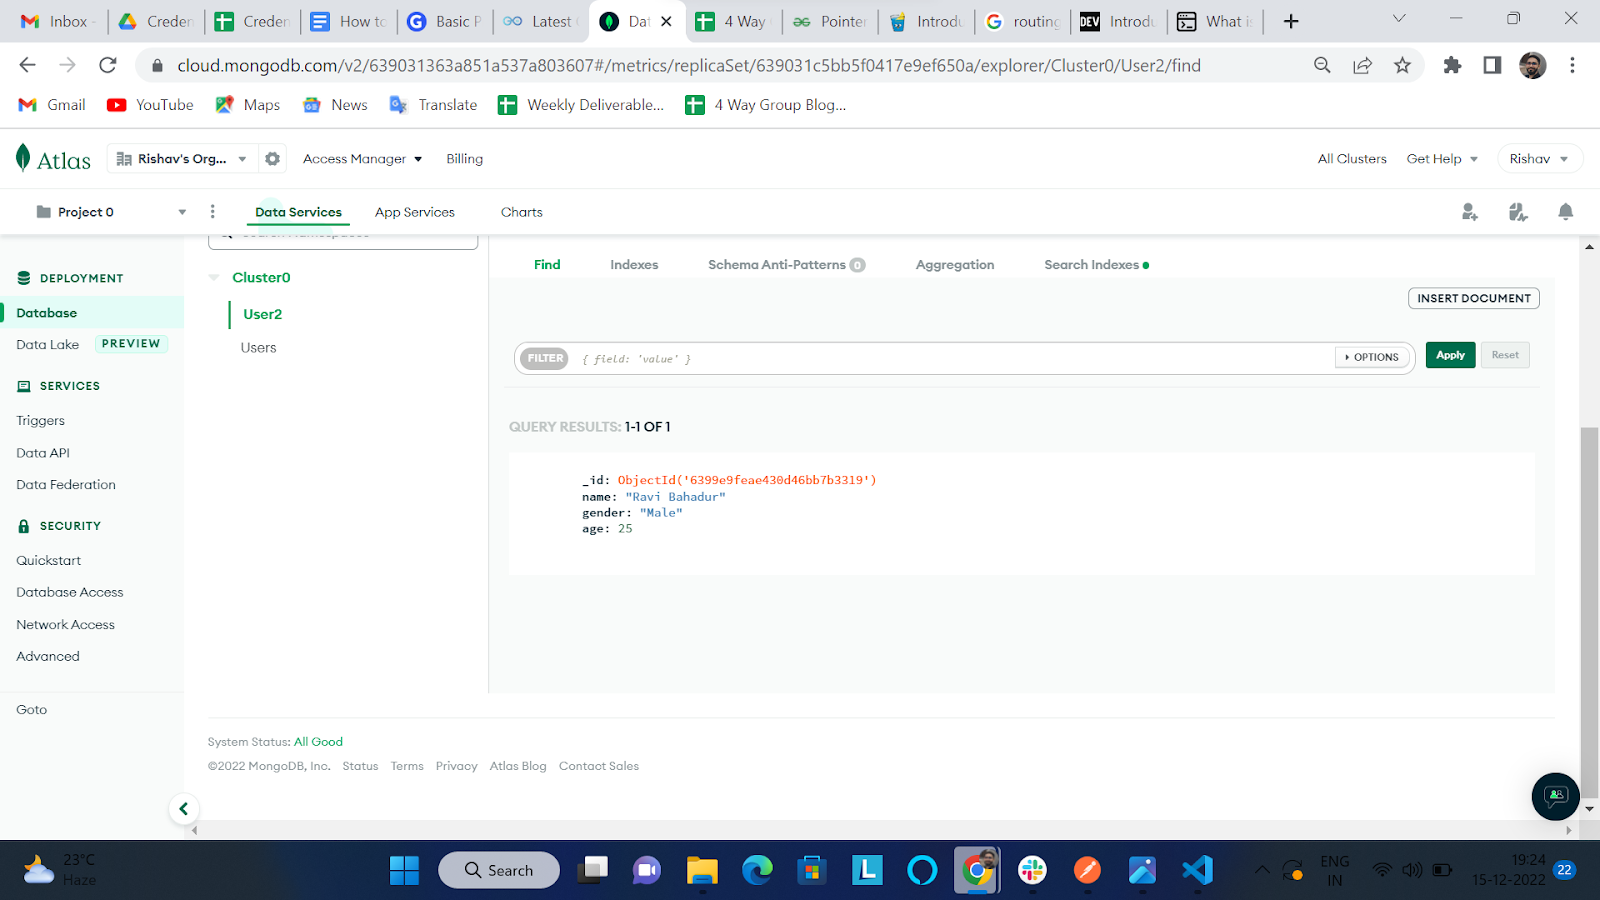
To confirm let’s check the database. Refer to image 6 where the data is not present. Therefore, The DELETE API is also working perfectly and the program has been executed as expected. As you can experience after following the blog how strict this language is, and strictness in the sense it doesn’t tolerate unused code in its syntax. This itself makes it fast and reliable among all other similar languages. This is why I believe organizations should hire golang developer because this language is going to make its space sooner or later in the IT Industry.
[Image 6]
[Image 7]


Build Your Golang Team